FOMEI Digital Pro X Studio Flash - PhotoRobot lietotāja rokasgrāmata
Šajā lietotāja rokasgrāmatā aprakstītas galvenās FOMEI Digital Pro X Studio Flash System sastāvdaļas un lietošanas instrukcijas. Informācijas mērķis ir atbalstīt PhotoRobot klientus Digital Pro X sērijas studijas zibspuldžu uzstādīšanā un lietošanā ar PhotoRobot. Tā aptver Digital Pro X 300, 500 un 1200 sērijas galvenās sastāvdaļas un studijas integrāciju.
Piezīme: Šī montāžas rokasgrāmata ir oficiālās FOMEI dokumentācijas reprodukcija. PhotoRobot un FOMEI ir oficiālie partneri, lai nodrošinātu izcilu produktu apgaismojumu PhotoRobot automatizētajām fotografēšanas sistēmām. Lai iegūtu oficiālo lejupielādējamo PDF versiju no ražotāja, skatiet FOMEI Gaismas un fotografēšanas vietne.
Svarīgi: Pirms lietošanas pārliecinieties, vai produkts ir neskarts un vai nav trūkstošu detaļu. Ja ir kāds defekts, lūdzu, sazinieties tieši ar FOMEI. Lai iegūtu informāciju par FOMEI produktu garantiju un apkopi, skatiet dokumentāciju, kas paredzēta tieši jūsu ierīcei.
PhotoRobot - FOMEI Digital Pro X Iestatīšana un lietošana
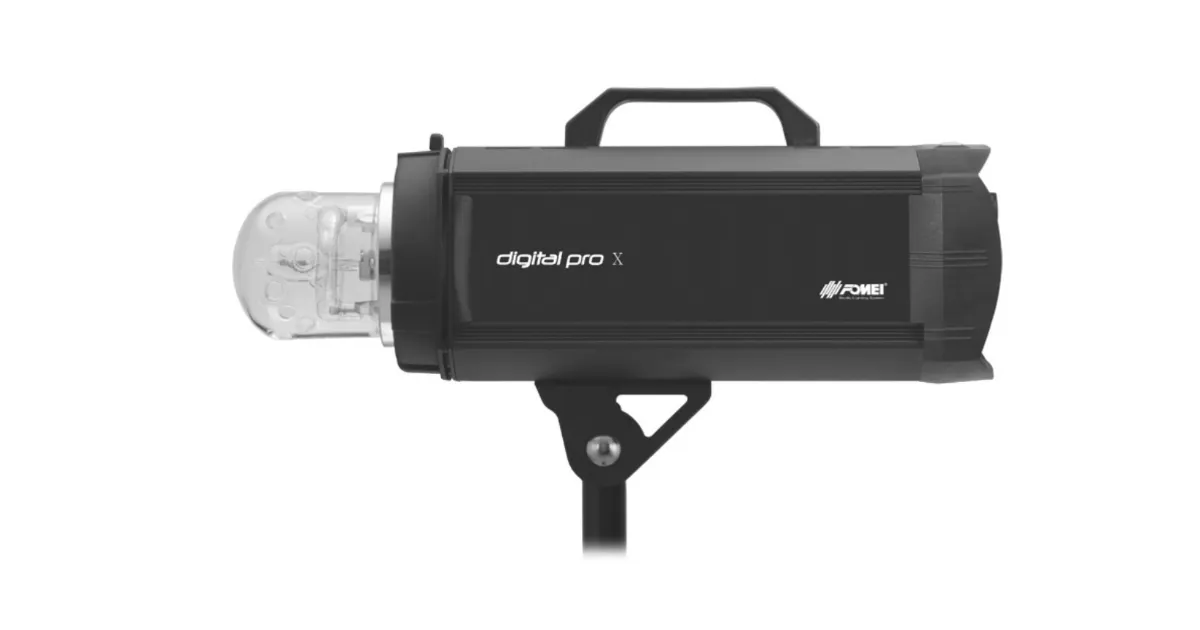
FOMEI Digital Pro X sērijas 300, 500 un 1200 ir augsto tehnoloģiju profesionālās studijas zibspuldzes, kas ir saderīgas ar PhotoRobot sistēmām. To unikālie, ātrās zibspuldzes uzlādes laiki nodrošina optimālu veiktspēju 360 un 3D fotografēšanā.
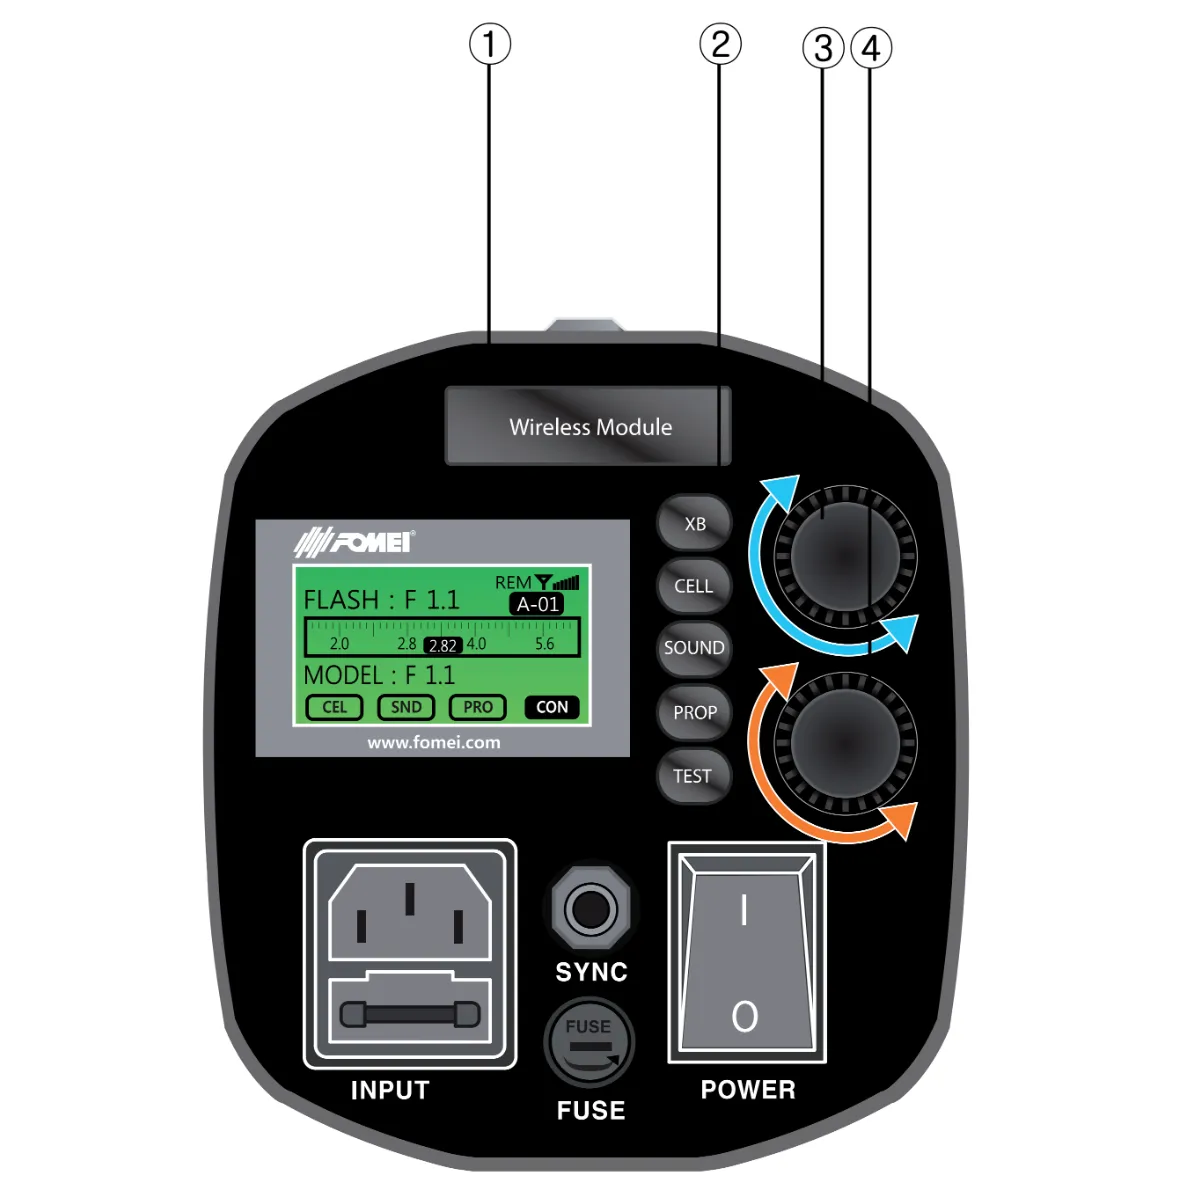
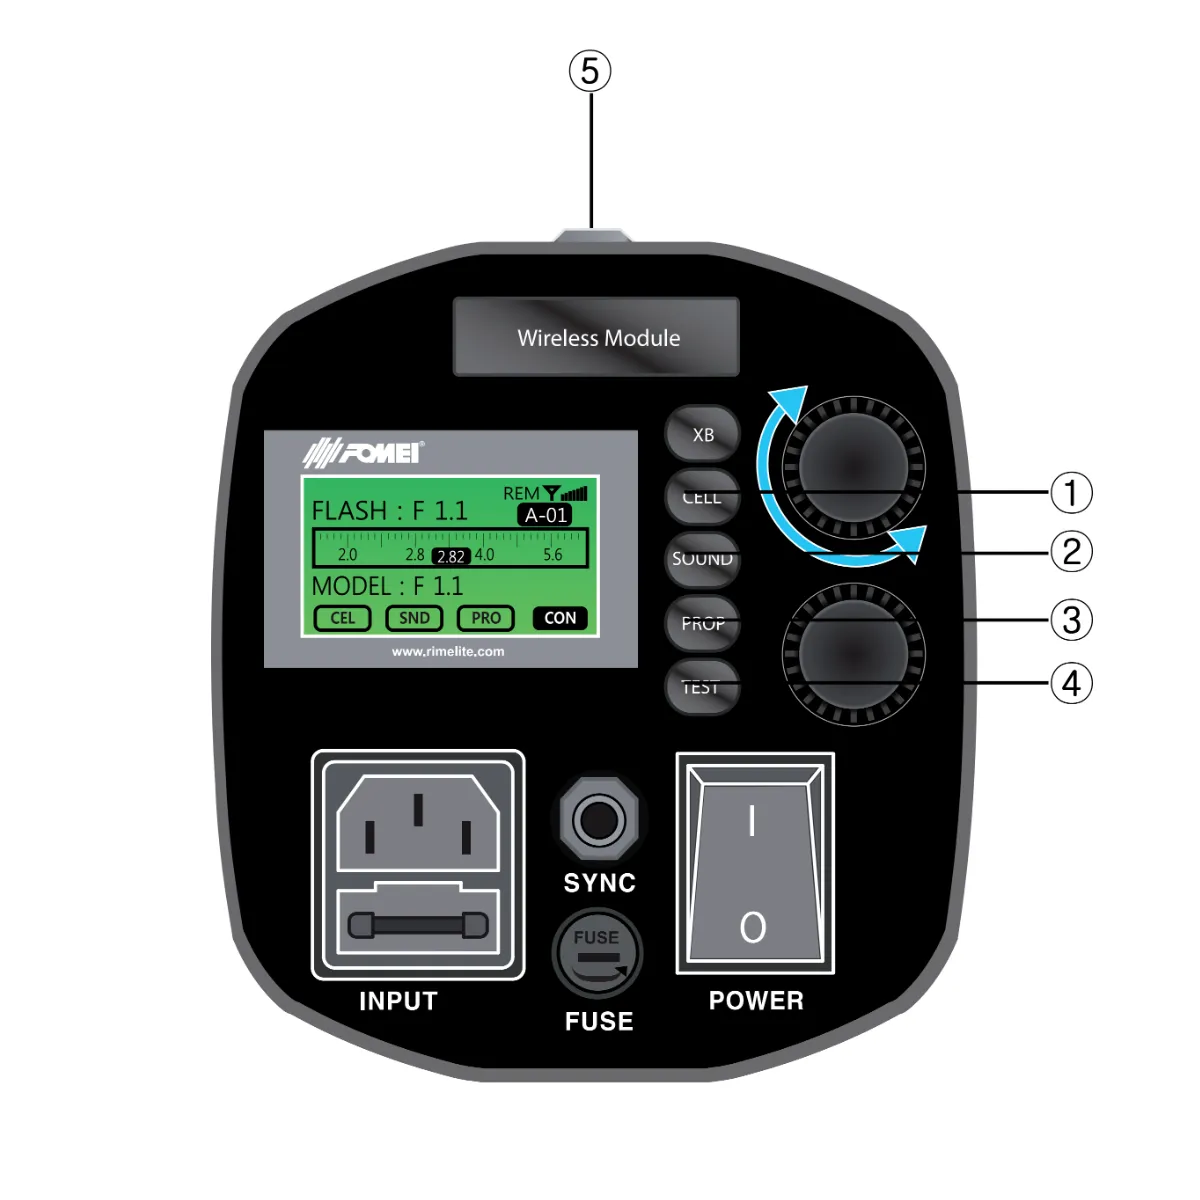
Digital Pro X vadība un displejs
Šajā infografikā detalizēti aprakstītas Digital Pro X vadības un displeja galvenās sastāvdaļas.
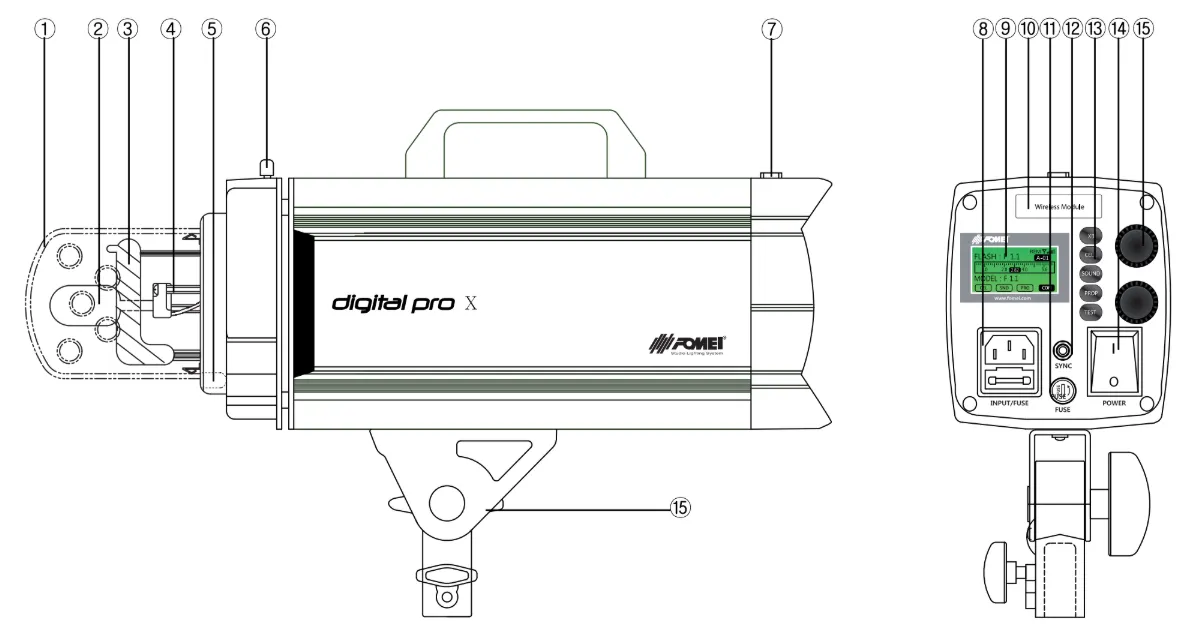
- Stikla aizsardzība
- Modelēšanas lampa
- Zibspuldzes caurule (pārbaudiet “H” atzīmi)
- Modelēšanas lampas ligzda
- Lietussargu turētājs
- Šūpojošs turētājs
- Fotoelements
- Galvenā ieeja
- LCD
- Tālvadības uztvērēja turētājs (interfeiss)
- Modelēšanas lampas drošinātājs
- Sinhronizācijas ligzda
- Funkciju pogas
- Ieslēgšanas/izslēgšanas slēdzis
- Jaudas intensitāte uz augšu/uz leju (digitālais kodētājs)
- Spilgtuma modelēšana uz augšu/uz leju (digitālais kodētājs)
Lietošanas instrukcijas: Infografika 1
Piezīme:
A. Galvenais strāvas kabelis jāpievieno galvenajai ieejai (pagrieziet strāvas slēdzi (Power S/W) pozīcijā ON)
B. Kad IESLĒGTS, pirmais ekrāns tiks parādīts šādi.
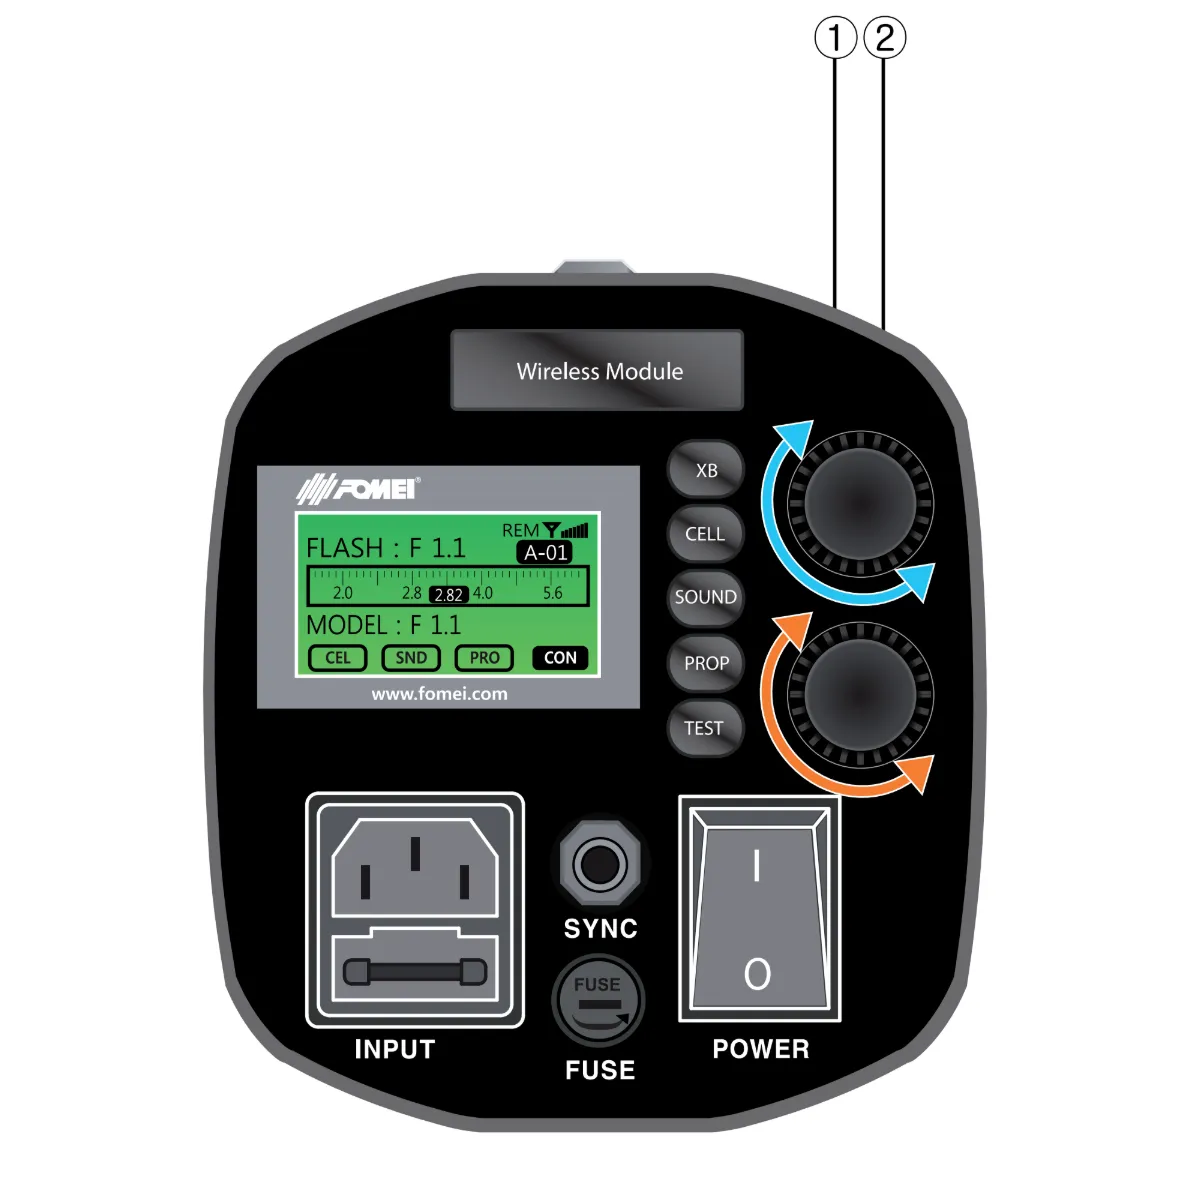
Kā iestatīt zibspuldzes jaudas intensitāti (1)
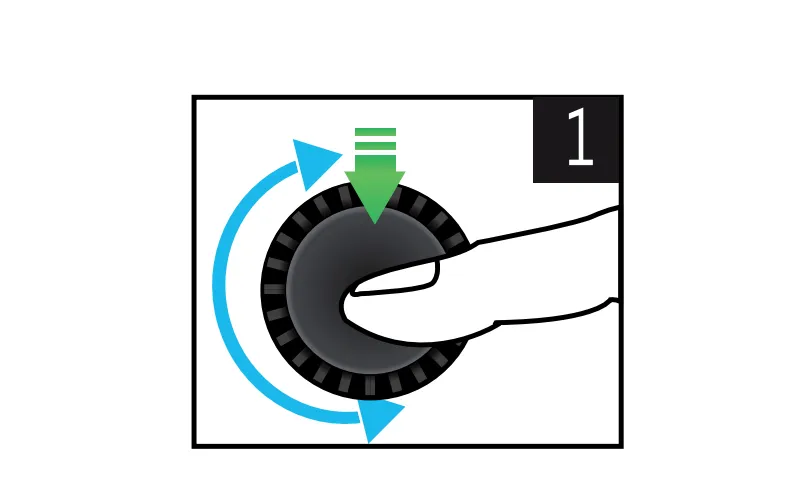

1. Palielināt / Samazināt par 0,1 F-stop.
- Pagrieziet digitālā kodētāja skaļumu pa labi, lai palielinātu jaudas intensitāti.
- Pagrieziet digitālā kodētāja skaļumu pa kreisi, lai samazinātu jaudas intensitāti.
2. Iestatiet maksimālās jaudas izvades režīmu.
- Nospiediet ciparripu (kodētāju) tikai vienu reizi.
3. Iestatīt minimālās jaudas izvades režīmu.
- Nospiediet ciparripu (kodētāju) divas reizes.
4. Palaidiet atjaunošanas režīmu.
- Nospiediet ciparripu (kodētāju) četras reizes, lai atjaunotu pēdējo lietotāja iestatīto jaudas intensitātes vērtību.
Modelēšanas gaismas funkcijas (2)
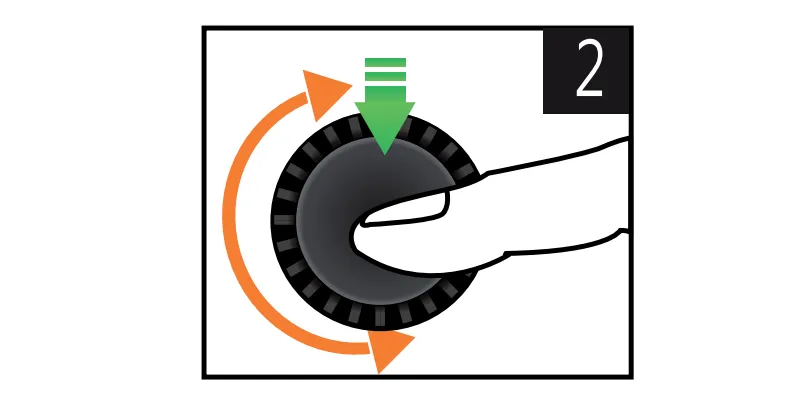
1. Palielināt / Samazināt par 0,1 F-stop (Modelēšanas gaismas spilgtums).
- Pagrieziet digitālā kodētāja skaļumu pa labi, lai palielinātu modelēšanas gaismas spilgtumu.
- Pagrieziet digitālā kodētāja skaļumu pa kreisi, lai samazinātu modelēšanas gaismas spilgtumu.
2. Iestatiet modelēšanas gaismas režīma maksimālo spilgtumu.
- Nospiediet ciparripu (kodētāju) tikai vienu reizi.
3. Iestatiet minimālo modelēšanas gaismas režīmu.
- Nospiediet ciparripu (kodētāju) divas reizes.
4. Izslēdziet modelēšanas gaismu.
- Nospiediet ciparripu (kodētāju) trīs reizes.
5. Palaist atjaunošanas režīmu.
- Nospiediet ciparripu (kodētāju) četras reizes, lai atjaunotu pēdējo lietotāja iestatīto modelēšanas gaismas spilgtuma vērtību.
Lietošanas instrukcijas: Infografika 2

Attālināto sistēmu iestatīšana – bezvadu turētājs (1)
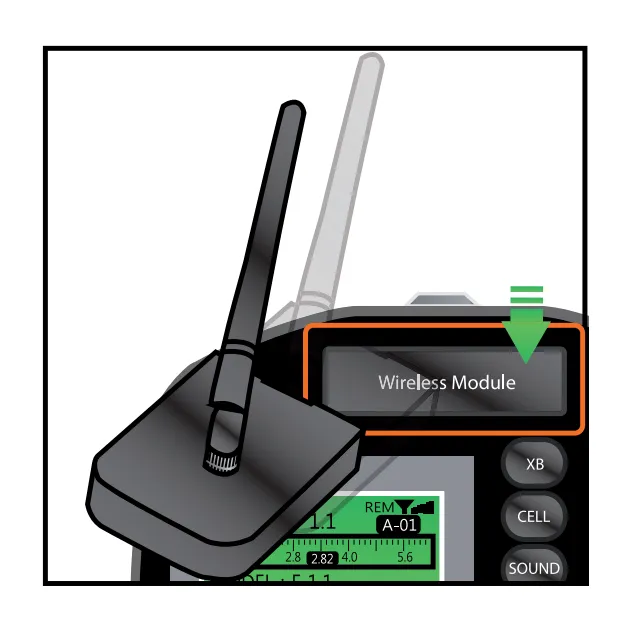
Piezīme:
A. Digital Pro X sērijas zibspuldžu darbībai nepieciešams bezvadu uztvērējs, lai atbalstītu vadību ar tālvadības pulti un datoru.
B. Pievienojiet bezvadu uztvērēju aizmugurējam vākam.
Studijas un kanāla iestatīšana (2, 3, 4)
Digital Pro X sērijai ir režīmi gan studijai, gan kanālam.
Piezīme: Katrs Studio režīms sastāv no 10 zibspuldzēm (kanāliem).
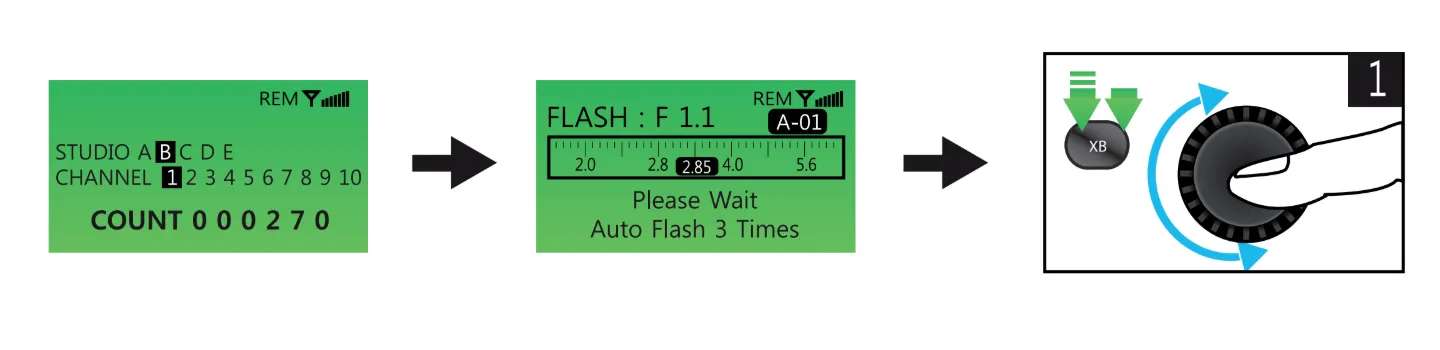
Piemēram, gadījums, kad lietotājs vēlas izmantot divas studijas zāles vienā un tajā pašā apgabalā un trīs Digital Pro X katrā studijā. Šajā gadījumā ir iespējams izmantot grupas režīmu, lai iestatītu grupas nosaukumu (piemēram, “B”) un katrai grupai piešķirtu unikālu kanāla numuru. Skatiet trīs attēlus un soļus zemāk.
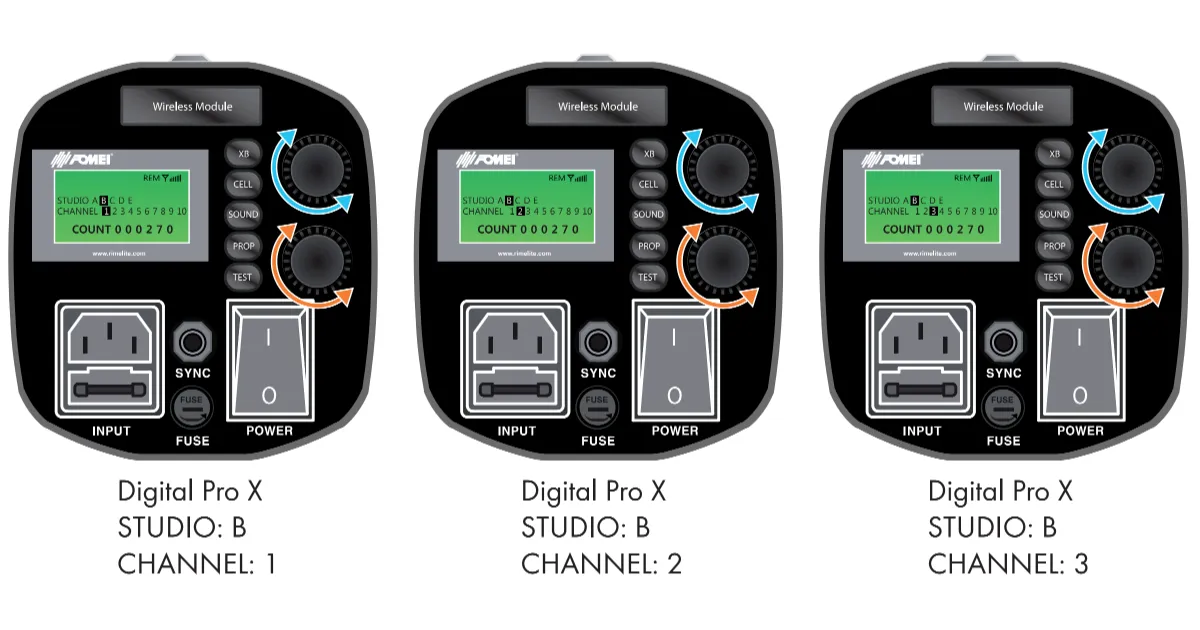
1. Kā mainīt zibspuldzes grupas nosaukumu
- Atrodiet pogu “XB” (Infografika 2.2.).
- Nospiediet pogu “XB” un turiet vismaz 3 sekundes.
- Režīma skats grupas nosaukuma maiņai tiks parādīts LCD ekrānā.
- Lai mainītu grupas nosaukumu, pagrieziet ciparripu (Infografika 2.3.) pa labi vai pa kreisi, lai ritinātu nosaukumus, un vēlreiz īsi nospiediet pogu “XB”, lai apstiprinātu grupas izvēli.
2. Kā mainīt stroboskopa kanāla numuru
- Izmantojiet pogu “XB” (Infografika 2.2.).
- Nospiediet pogu “XB” un turiet vismaz 3 sekundes.
- LCD displejā parādīsies režīma skats, lai mainītu grupas nosaukumu.
- Lai mainītu kanāla numuru, pagrieziet ciparripu (Infografika 2.4.) pa labi vai pa kreisi, lai ritinātu kanālu numurus, un vēlreiz īsi nospiediet pogu “XB”, lai apstiprinātu kanāla izvēli.
Lietošanas instrukcijas: Infografika 3
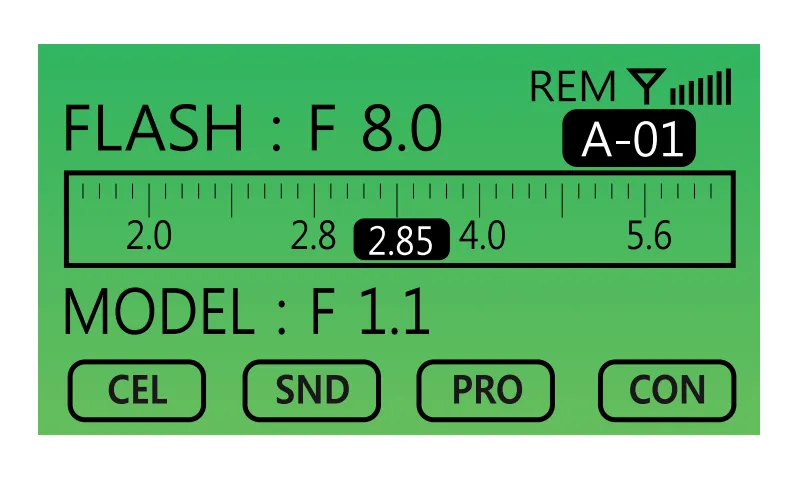
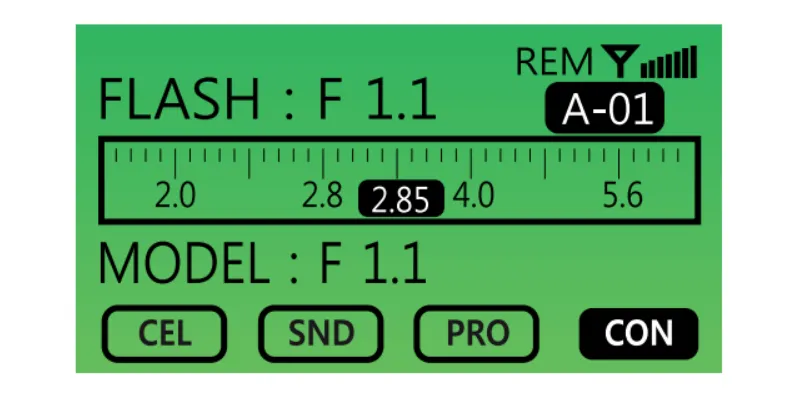
Kā iestatīt ACS (diafragmas vadības sistēmu)
Ņemiet vērā, ka pēc sākotnējās ekspozīcijas vērtības iestatīšanas Digital Pro X ierīce nodrošina precīzas ekspozīcijas korekcijas bez ārēja ekspozīcijas mērītāja nepieciešamības. Tas ļauj lietotājam jebkurā laikā palielināt vai samazināt ekspozīcijas vērtību, izmantojot ierīces vadības elementus un LCD displeju. LCD displejs rāda precīzu ekspozīcijas vērtību, un attēlotā vērtība paliek precīza, kamēr nemainās relatīvās pozīcijas un attālumi starp objektu, kameru un Digital Pro X.
1. Kā pārbaudīt ACS
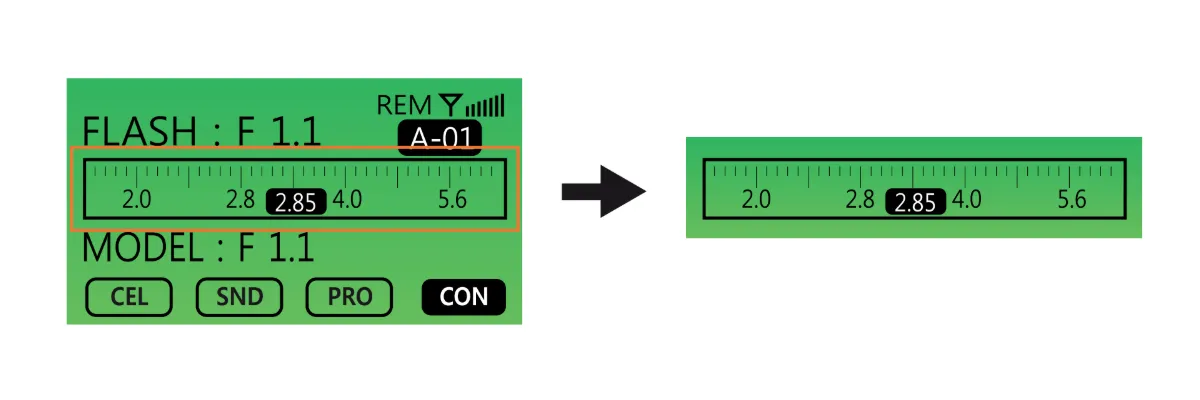
- LCD displejs norāda pašreizējo ACS statusu.
- Kad ACS ir gaidīšanas režīmā, šis statuss tiek parādīts ekrānā.
2. Kā atiestatīt ACS
- Nospiediet pogu “XB” (Infografika 3.2.) un turiet vismaz 3 sekundes – LCD displejā tiks parādīts attēls zemāk (pa kreisi).
- Nospiediet pogu “XB” vēlreiz – LCD logā tiks parādīts attēls zemāk (centrā).
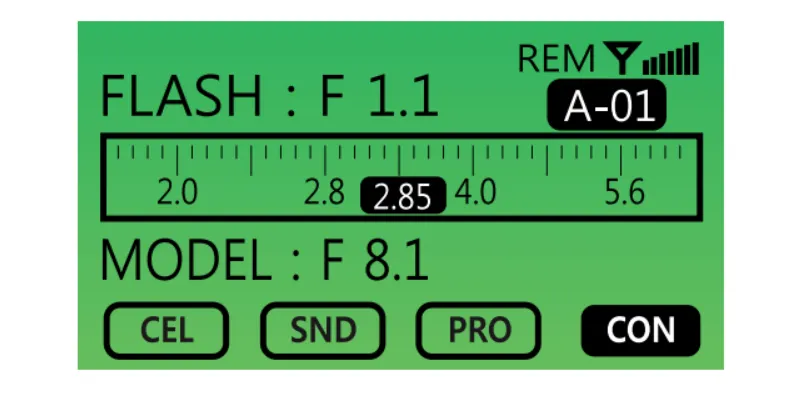
- Pagriežot ciparripu (Infografika 3.3.) pa labi vai pa kreisi, lietotājs var atiestatīt ekspozīcijas vērtību ar precīziem datiem. Tomēr, lai izmantotu šo funkciju, lietotājam vispirms būs jāpārbauda pareizā ekspozīcijas vērtība, izmantojot ekspozīcijas mērītāju.
- Pēc ekspozīcijas vērtības pārbaudes ar ekspozīcijas mērītāju, lietotājs ievada precīzu ekspozīcijas vērtību Digital Pro X ierīcē. Pēc tam lietotājam vairs nebūs jāizmanto ekspozīcijas mērītājs, kamēr relatīvās pozīcijas un attālumi starp objektu, kameru un Digital Pro X paliek nemainīgi.
3. Kā ievadīt pareizu ekspozīcijas vērtību
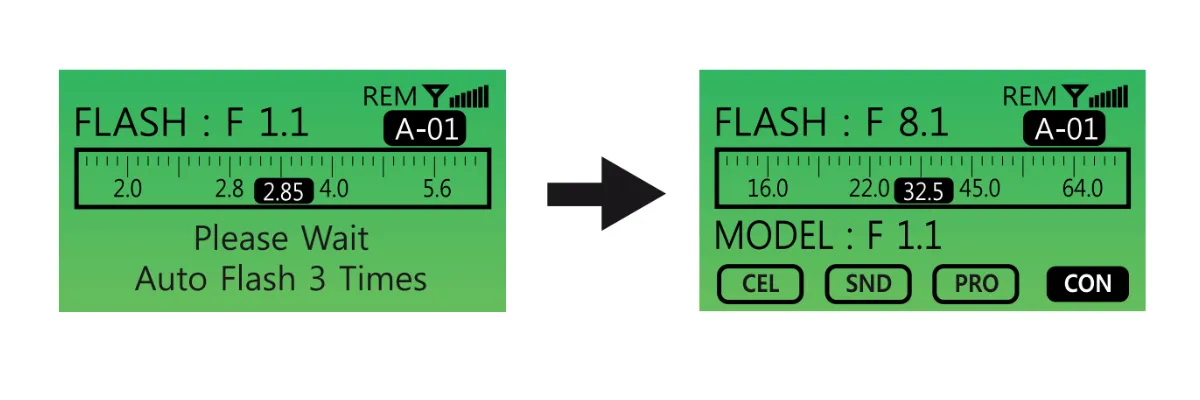
- Lietotājam jāievada pareizā ekspozīcijas vērtība Digital Pro X, kad tā jaudas intensitāte (F-stop) ir F1.1.
- Izvēlieties ekspozīcijas vērtību, pagriežot ciparripu (Infografika 3.3.) pa labi vai pa kreisi.
- Ievadiet ekspozīcijas vērtību pēc divreizējas pogas “XB” nospiešanas.
- Piemēram, skatiet attēlus iepriekš.
Ja izmērītā ekspozīcijas vērtība ir 32,5 i-stop, ievadiet šo vērtību Digital Pro X. Kad ekspozīcijas vērtība ir iestatīta, turpmākas ekspozīcijas korekcijas var veikt tieši ierīcē, neizmantojot ārēju ekspozīcijas mērītāju nākamajiem attēliem.
Lietošanas instrukcijas: Infografika 4
Citas funkcijas
1. FotoELEMENTS IESLĒGTS / IZSLĒGTS
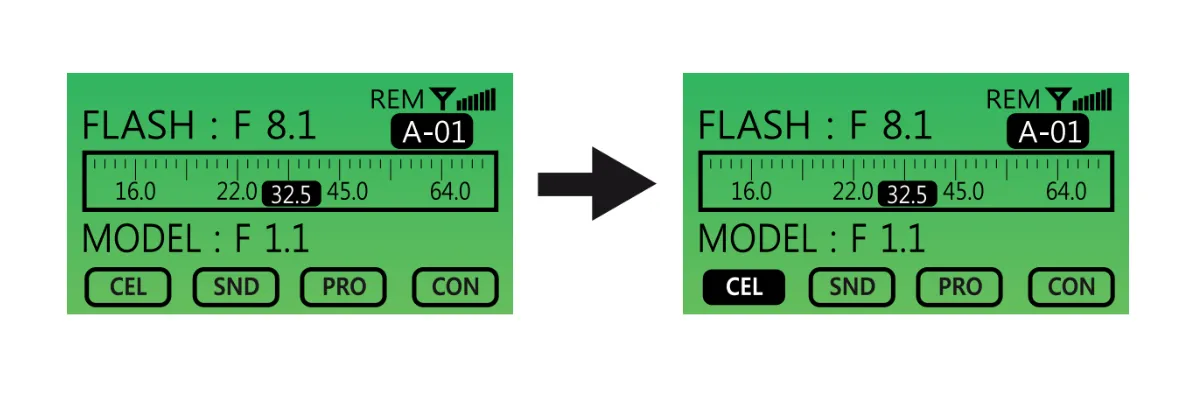
- Nospiediet pogu CELL vienu reizi. Kad LCD displejā parādās izcelts “CELL” ikona ar vienkrāsainu fonu (aizpildīta melnā krāsā), fotoelementu funkcija ir aktīva. Lai deaktivizētu funkciju, nospiediet pogu CELL vēlreiz.
2. Skaņa IESLĒGTA / IZSLĒGTA
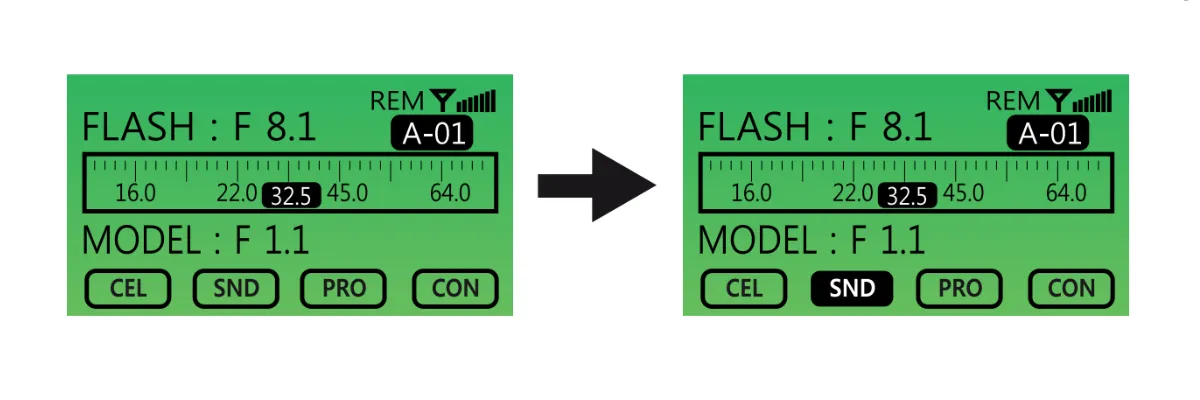
- Nospiediet pogu SOUND (“SND”) vienu reizi, lai ieslēgtu. Kad aktīvs, ikona “SND” tiks izcelta. Lai to deaktivizētu, nospiediet pogu SOUND vēlreiz.
3. Proporcionālā (PROP) modelēšanas gaisma
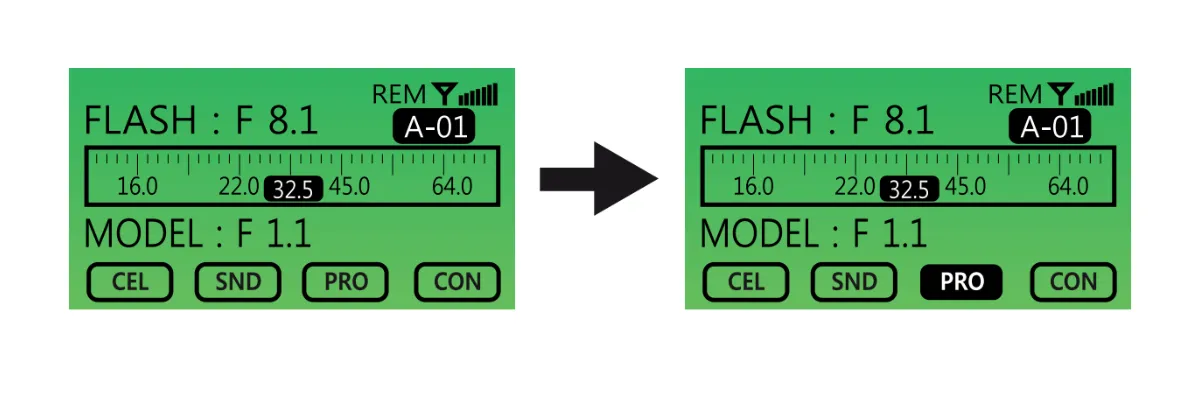
- Pārslēdziet proporcionālās (PROP) ON / OFF modelēšanas gaismas iestatījumu, vienreiz nospiežot pogu, lai aktivizētu, un vēlreiz, lai deaktivizētu. Kad aktīva, PROP poga tiks izcelta ar tumšu fonu.
4. Nepārtraukta modelēšanas gaisma IESLĒGTA / IZSLĒGTA
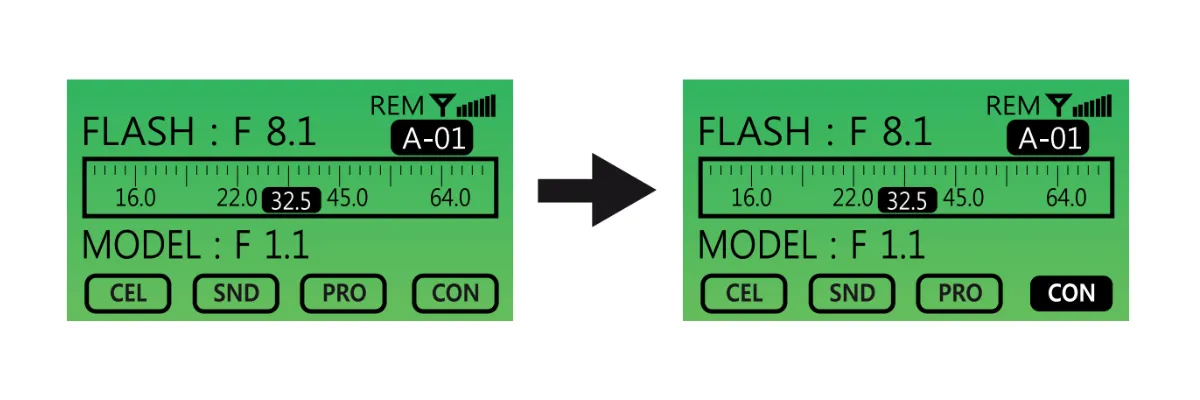
- Izmantojiet pogu CONTINUOUS (CON), lai ieslēgtu / izslēgtu nepārtrauktu modelēšanas gaismu. Pogas darbība ir tāda pati kā iepriekš.
4. TEST poga
- Izmantojiet pogu TEST, lai pārbaudītu, vai zibspuldzes caurule ir izlādējusies.
Kā iestatīt tālvadības pulti
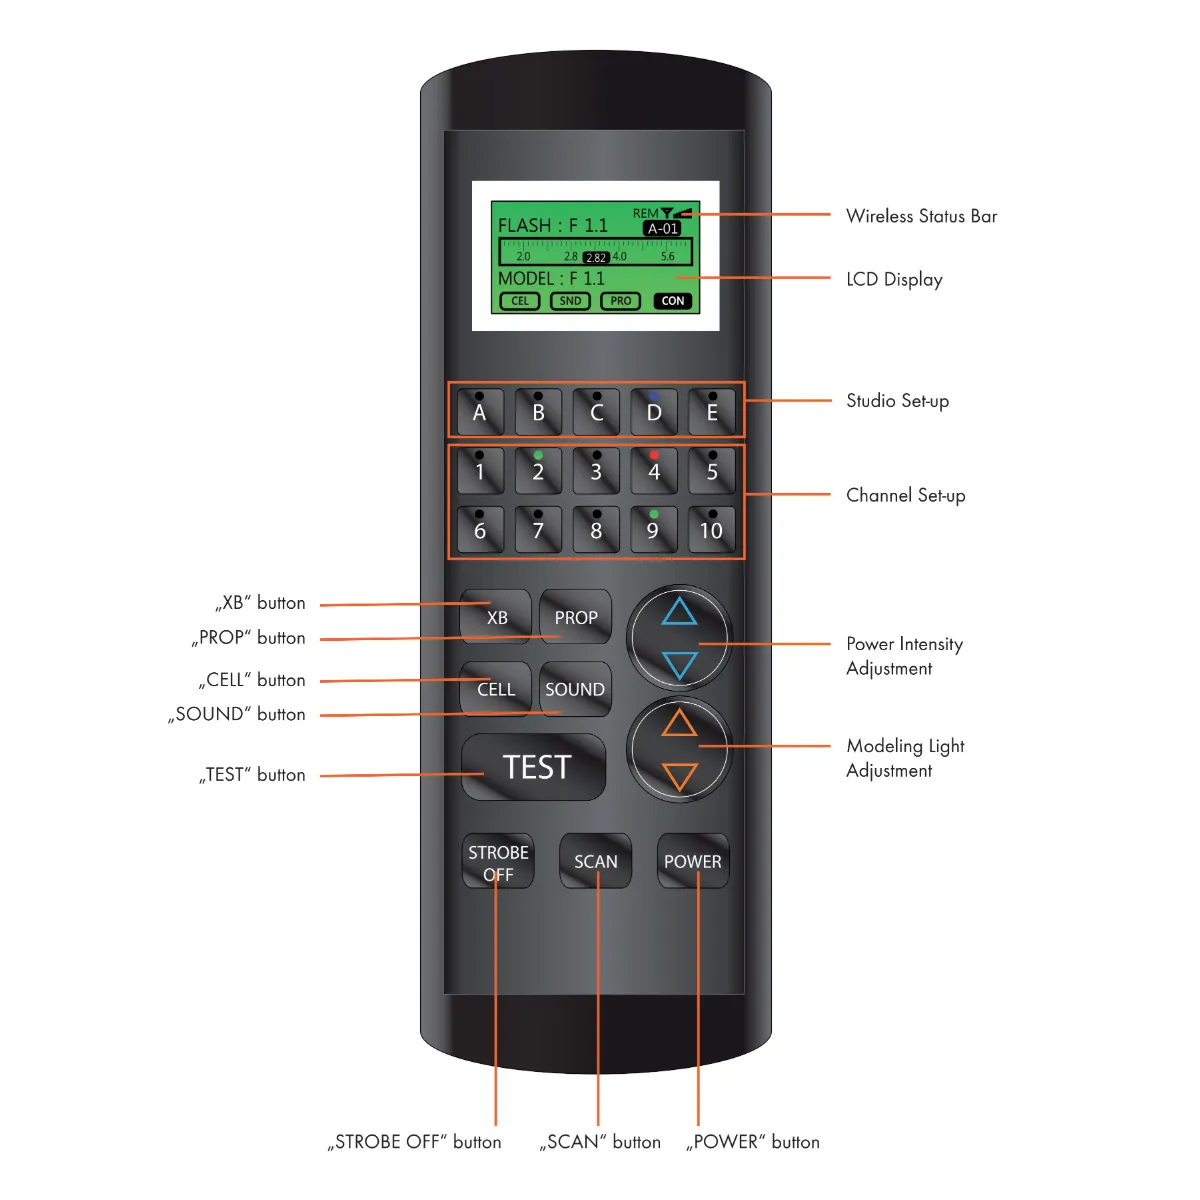
Piezīme:
A. Lielākā daļa tālvadības pults vadības elementu darbojas tāpat kā Digital Pro X vadības elementi.
B. Ir tikai dažas vadības ierīces, kas atšķiras starp Digital Pro X un tālvadības pulti.
1. “XB” Poga
- Pirmā pogas “XB” funkcija ir katra stroboskopa (kanāla) aktivitātei.
- Lai pielāgotu katras zibspuldzes (kanāla) funkcijas, vispirms atlasiet pielāgojamo zibspuldzi un pēc tam nospiediet pogu “XB”. Tas ļaus pielāgot zibspuldzes (kanāla) funkcijas.
- Otrā “XB” pogas funkcija ir ACS režīms. Nospiediet un turiet XB pogu 3 sekundes, lai aktivizētu ACS režīmu. ACS režīmā zibspuldzes jaudu var regulēt ar 0,1 f-stop soli.
2. Poga “CELL”
- Ieslēgt / Izslēgt fotoelementu
3. poga “SND”
- Ieslēgt / Izslēgt skaņu
4. poga “PROP”
- Īsi nospiediet un turiet pogu “PROP”, lai pārslēgtu proporcionālo modelēšanas gaismu ar jaudas intensitāti IESLĒGTS / BEZMAKSAS.
- Nospiediet un turiet “PROP” vismaz 2 sekundes, lai pārslēgtu proporcionālo modelēšanas gaismu Nepārtraukti IESLĒGTS / IZSLĒGTS.
5. “TEST” Poga
- Nospiediet pogu “TEST”, lai pārbaudītu, vai zibspuldzes caurule ir izlādējusies.
6. Poga “STROBE OFF”
- Izmantojiet pogu “STROBE OFF”, lai mainītu zibspuldzes barošanas slēdža statusu ON / OFF.
- Izvēlieties zibspuldzi un nospiediet “STROBE OFF”, lai ieslēgtu / izslēgtu.
- Piemēram, lai ieslēgtu / izslēgtu Digital Pro X zibspuldzi, vispirms izvēlieties GRUPU (Studija) pēc nosaukuma (t.i., “Group A”), pēc tam izvēlieties KANĀLA numuru un visbeidzot izmantojiet “STROBE OFF”, lai ieslēgtu / izslēgtu grupu un kanālu.
7. Poga “Skenēt”
- Nospiediet pogu “SCAN”, lai skenētu kopējo zibspuldžu skaitu, kas pievienotas tālvadības pultij.
8. “POWER” Poga
- Nospiediet “POWER”, lai ieslēgtu tālvadības pulti.
- Piezīme: Tālvadības pults automātiski izslēgsies pēc 1 minūtes bezdarbības.
Kā instalēt Digital Pro X draiveri
Draivera instalēšanas laikā Digital Pro X sērijas zibspuldzēm ņemiet vērā sekojošo.
A. Lielākā daļa Digital Pro X draivera pamatfunkciju ir tādas pašas kā Digital Pro X ierīces funkcijas.
B. Tikai dažas funkcijas atšķiras starp draiveri un ierīci.
1. Sāciet operētājsistēmas programmas instalēšanu.
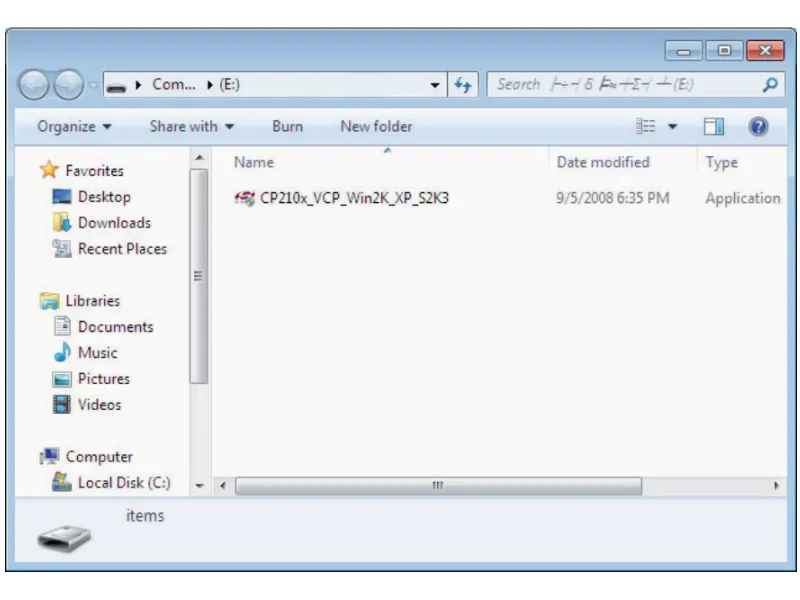
- Veiciet dubultklikšķi uz CP210x_VCP_Win2K_XP_S2K3.exe, lai sāktu instalēšanu.
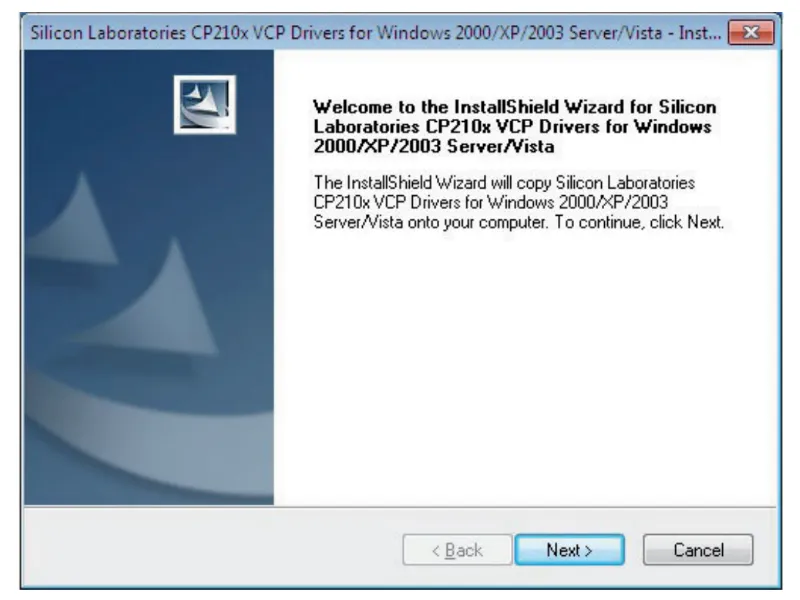
2. Noklikšķiniet uz “Tālāk”, lai turpinātu instalēšanas procedūru.
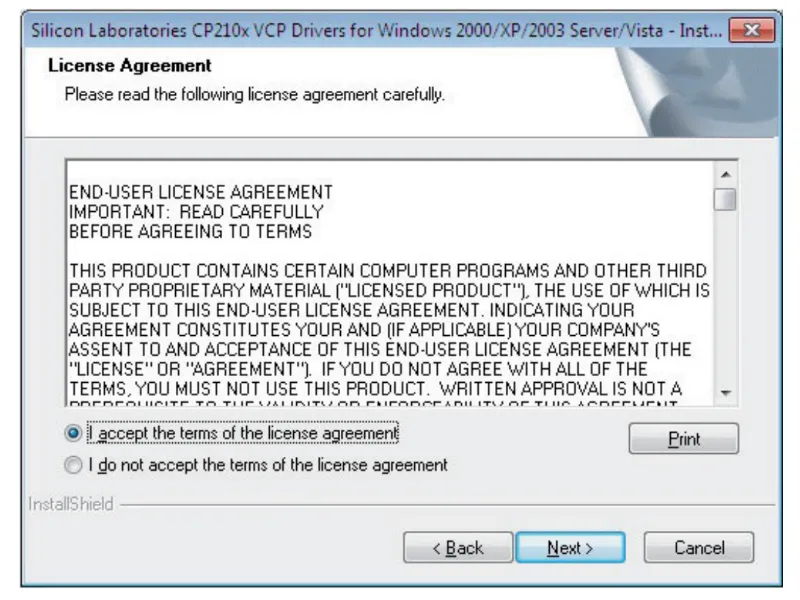
3. Izlasiet un pieņemiet licences līguma noteikumus un vēlreiz noklikšķiniet uz “Tālāk”.
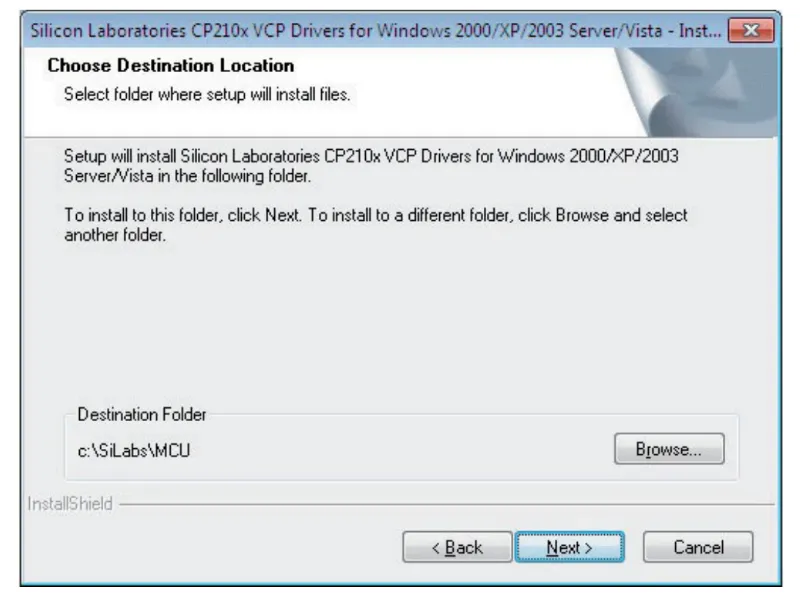
4. Atlasiet galamērķa mapi, lai instalētu programmu, un noklikšķiniet uz “Tālāk”.
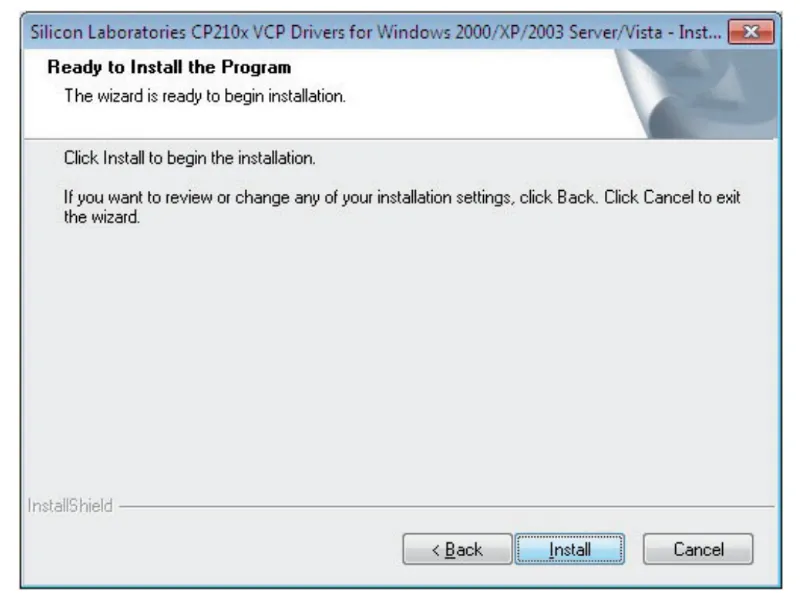
5. Noklikšķiniet uz “Instalēt”, lai palaistu instalēšanas vedni.
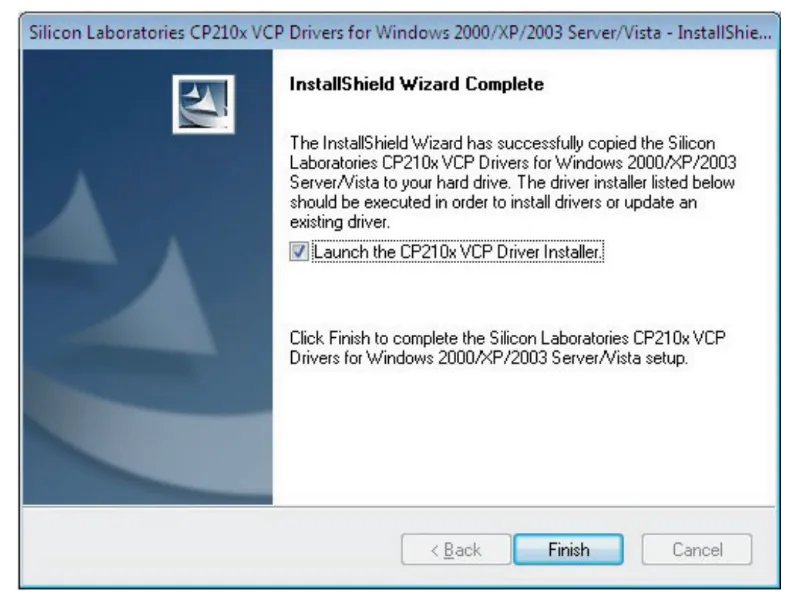
6. Atzīmējiet izvēles rūtiņu “Palaist CP2l0x VCP draivera instalētāju” un noklikšķiniet uz “Pabeigt”.
7. Pēc veiksmīgas lejupielādes pārbaudiet, vai jūsu datora ierīču pārvaldniekā ir instalēts “Silicon Labs CP210 x USB to UART Bridge (COM 3)”.
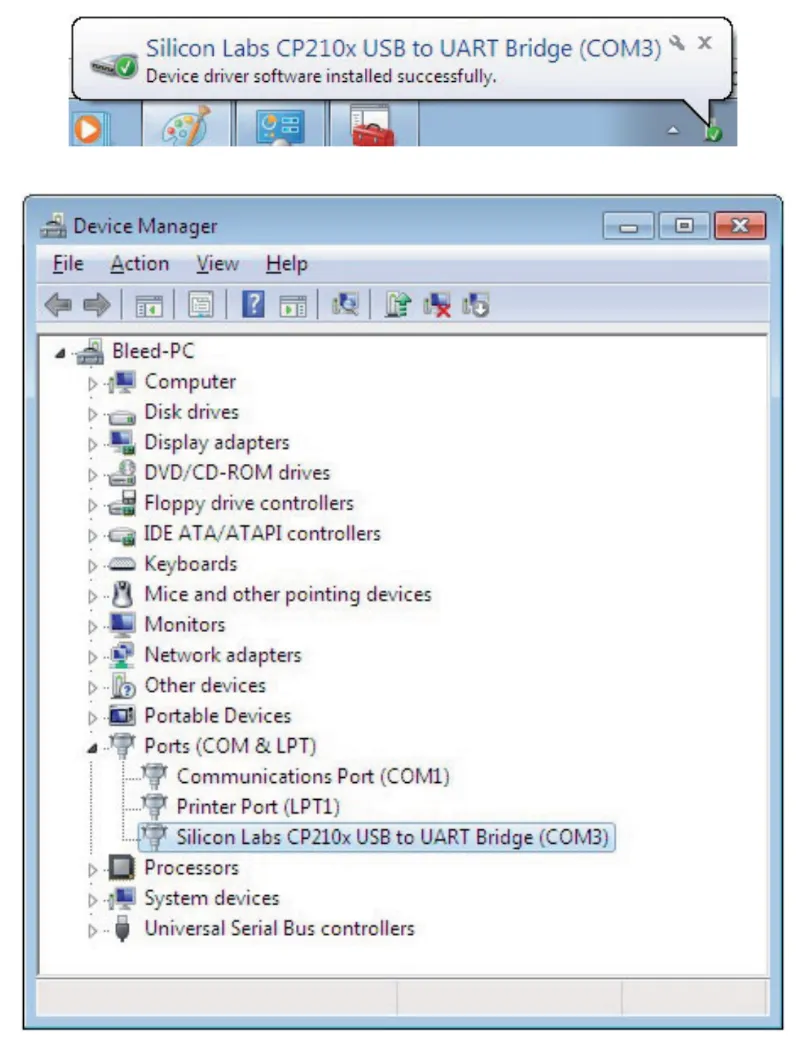
- Pārbaudiet, izmantojot Mans dators > Vadības panelis > Ierīču pārvaldnieks > Noklikšķiniet uz “PORTI (COM & LPT)”
8. Palaidiet programmu “Lights Extended” un noklikšķiniet uz ikonas Lights Extended.
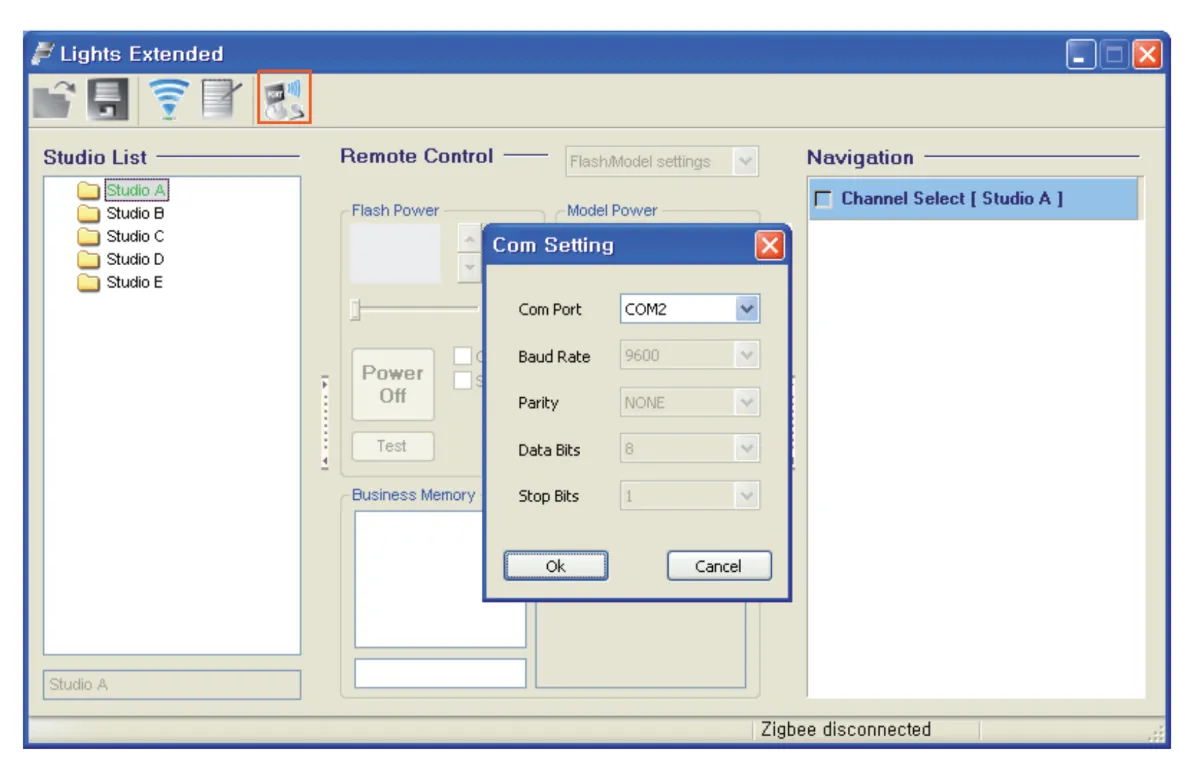
- Ikona “Lights Extended” atrodas saskarnes augšējā kreisajā izvēlnē. Noklikšķiniet uz ikonas, lai atvērtu uznirstošo logu, un pēc tam iestatiet COM porta numuru, lai tas atbilstu iepriekš redzamajam.
9. Noklikšķiniet uz ikonas “Skenēt”, lai automātiski skenētu un noteiktu kopējo zibspuldžu skaitu, kas pievienotas katrai studijai (grupai).
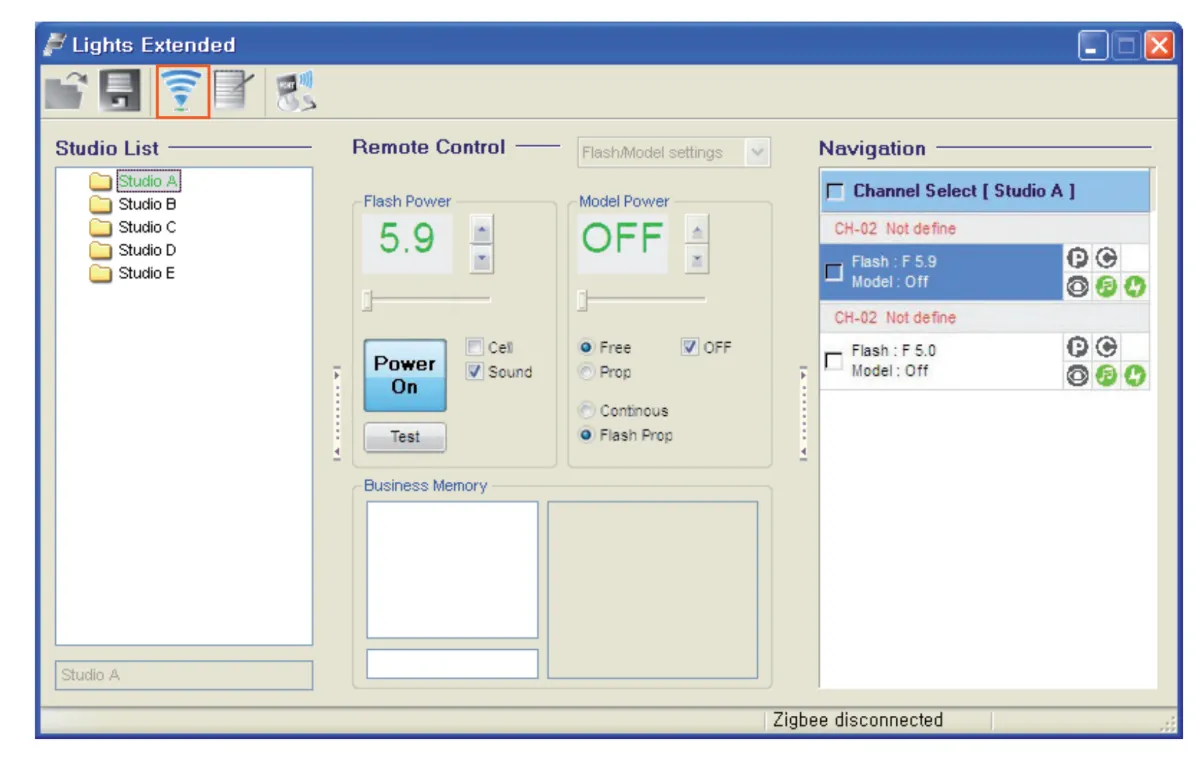
- Pēc noteikšanas visas ar USB savienotās zibspuldzes ir gatavas darbam.
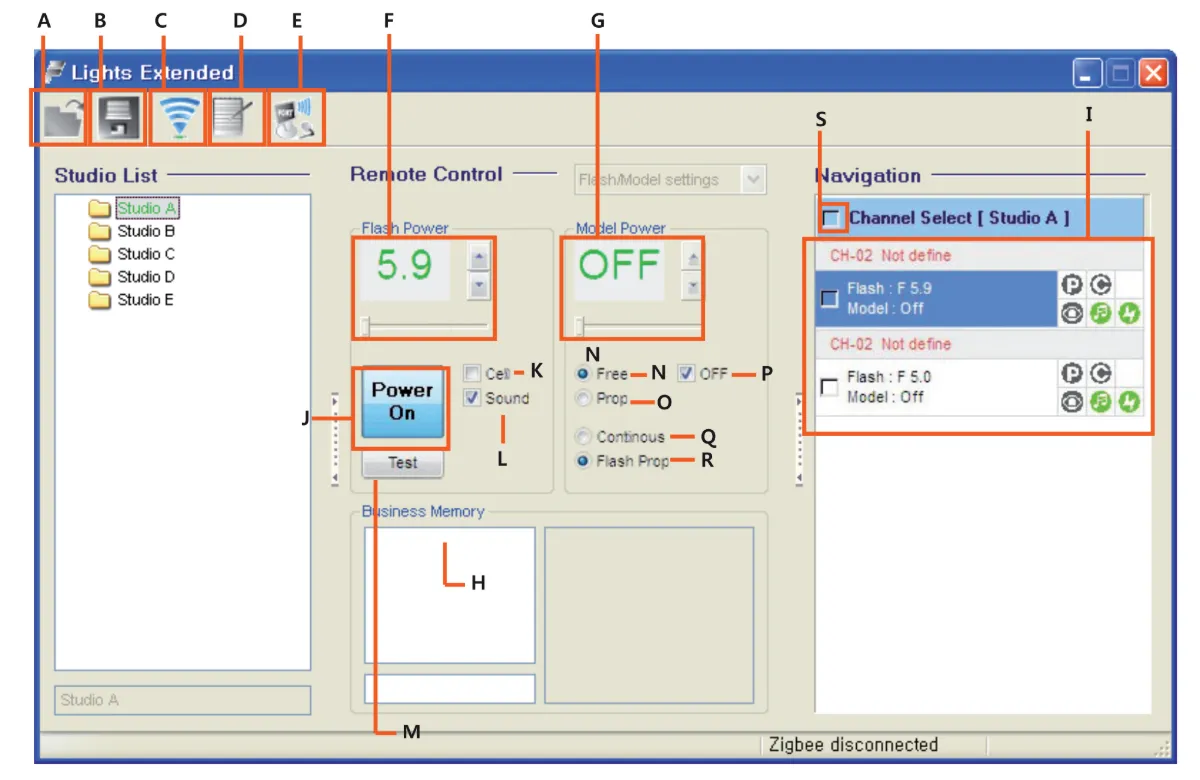
A. Imports
B. Saglabāt
C. Skenēt zibspuldzes
D. Mainīt zibspuldzes nosaukumu sarakstā “Studijas saraksts”
E. Mainīt COM portu
F. Iestatīt zibspuldžu izvadi
G. Iestatiet modelēšanas gaismas izvadi
H. Izvēlieties atmiņas formātu
I. Statusa logs
J. Ieslēgšanas / izslēgšanas ikona
K. Fotoelementa IESLĒGŠANAS / IZSLĒGŠANAS ikona
L. Stroboskopa skaņas ON / OFF ikona
M. Testēšanas ikona
N. Modelēšanas gaisma brīvi IESLĒGTA
O. Modelēšanas gaisma PROP ON
P. Modelēšanas gaisma IESLĒGTA / IZSLĒGTA
J. Modelēšanas gaisma Nepārtraukti IESLĒGTA
R. Modelēšanas gaisma nepārtraukti IZSL.
S. Atlasīt VISUS zibspuldzes.
Informācijas etiķetes

Ņemiet vērā, ka informācijas zīme ar pārsvītrotu atkritumu tvertni nozīmē, ka Eiropas Savienībā produkts:
- Pēc kalpošanas laika beigām jāsavāc atsevišķi saskaņā ar piemērojamajiem elektronisko atkritumu noteikumiem.
- Tas attiecas uz ierīci un visiem piederumiem, kas marķēti ar šo simbolu.
- Neizmetiet šos produktus kā nešķirotus sadzīves atkritumus.
Noslēguma piezīmes
Šī lietotāja rokasgrāmata Digital Pro X Studio sērijas zibspuldzei ir oficiālo resursu reprodukcija no ražotāja FOMEI. Lai iegūtu oficiālo dokumentāciju no ražotāja un garantijas informāciju par jūsu konkrēto FOMEI ierīci, apmeklējiet fomei.com.


EOS Rebel sērija


EOS DSLR sērija


EOS M Mirrorless sērija


PowerShot sērija


Tuvplāns / Rokas

Canon EOS Rebel sērija piedāvā iesācējiem draudzīgas DSLR kameras ar stabilu attēla kvalitāti, intuitīvu vadību un daudzpusīgām funkcijām. Šīs kameras, kas ir ideāli piemērotas fotografēšanas entuziastiem, nodrošina uzticamu autofokusu, mainīga leņķa skārienekrānus un Full HD vai 4K video ierakstīšanu.
Sakars
Izšķirtspēja (MP)
Izšķirtspēju
Canon EOS DSLR sērija nodrošina augstas kvalitātes attēlus, ātru autofokusu un daudzpusību, padarot to ideāli piemērotu gan fotografēšanai, gan video veidošanai.
Sakars
Izšķirtspēja (MP)
Izšķirtspēju
Canon EOS M Mirrorless sērija apvieno kompaktu dizainu ar DSLR līdzīgu veiktspēju. Šīs kameras ar maināmiem objektīviem, ātru autofokusu un augstas kvalitātes attēla sensoriem ir lieliski piemērotas ceļotājiem un satura veidotājiem, kuri meklē pārnesamību, nezaudējot attēla kvalitāti.
Sakars
Izšķirtspēja (MP)
Izšķirtspēju
Canon PowerShot sērija piedāvā kompaktas, lietotājam draudzīgas kameras ikdienas šāvējiem un entuziastiem. Ar modeļiem, sākot no vienkāršām norādīšanas un fotografēšanas līdz uzlabotām tālummaiņas kamerām, tie nodrošina ērtības, stabilu attēla kvalitāti un tādas funkcijas kā attēla stabilizācija un 4K video.
Sakars
Izšķirtspēja (MP)
Izšķirtspēju
Canon tuvplāna un rokas kameras ir paredzētas detalizētai, tuvplāna fotografēšanai un video uzņemšanai. Kompakti un viegli lietojami, tie piedāvā precīzu fokusu, augstas izšķirtspējas attēlveidošanu un daudzpusīgas makro iespējas - lieliski piemēroti vlogošanai, produktu fotografēšanai un radošiem tuvplāniem.


