FOMEI Griestu sistēmas komplekts - PhotoRobot Lietotāja rokasgrāmata
Šajā lietotāja rokasgrāmatā aprakstītas FOMEI sliežu griestu apgaismojuma sistēmas galvenās sastāvdaļas un uzstādīšanas procedūras. Informācijas mērķis ir atbalstīt PhotoRobot klientus griestu sistēmas uzstādīšanā profesionālu studijas zibspuldžu un gaismekļu montāžai PhotoRobot. Tajā iekļauts visu galveno komponentu pārskats un uzstādīšanas soļi FOMEI griestu sistēmas komplektam 1 (3 x 3m), komplektam 2 (3 x 5m) un komplektam 3 (5 x 5m).
Piezīme: Šī montāžas rokasgrāmata ir oficiālās FOMEI dokumentācijas reprodukcija. PhotoRobot un FOMEI ir ilggadēji partneri, lai nodrošinātu izcilu produktu apgaismojumu PhotoRobot automatizētajām fotografēšanas sistēmām. Lai iegūtu oficiālo lejupielādējamo PDF versiju no ražotāja, skatiet FOMEI Gaismas un Fotogrāfijas vietni.
Svarīgi: Pirms lietošanas pārliecinieties, vai produkts ir neskarts un vai nav trūkstošu detaļu. Ja ir kāds defekts, lūdzu, sazinieties tieši ar FOMEI. Lai iegūtu informāciju par FOMEI produktu garantiju un apkopi, skatiet dokumentāciju, kas paredzēta tieši jūsu ierīcei.
PhotoRobot - FOMEI Griestu sistēmas iestatīšana
FOMEI griestu gaismas armatūras sistēma ir profesionālas kvalitātes sliežu, ratiņu, pantogrāfu un citu komponentu sistēma, kas vienkāršo darbu foto vai filmu studijā. Sistēma sastāv no trim dažādu izmēru komplektiem, kas ietver šādas detaļas un uzstādīšanas procedūras.
Piezīme: Griestu sistēmu ir iespējams papildināt arī ar citām nepieciešamajām sastāvdaļām.
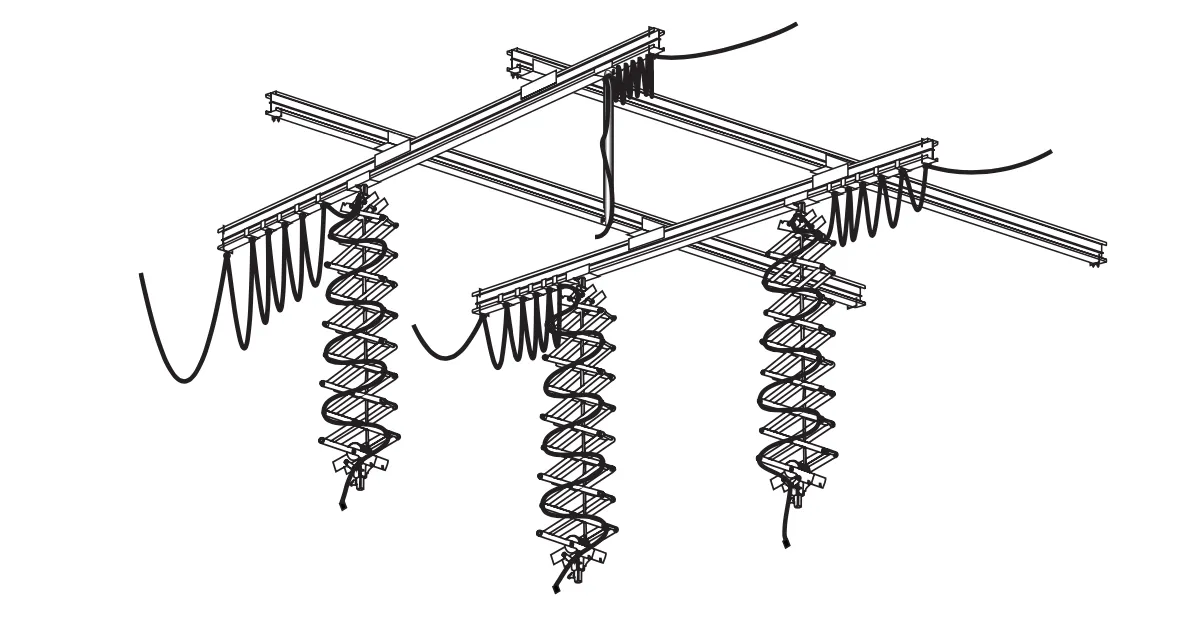
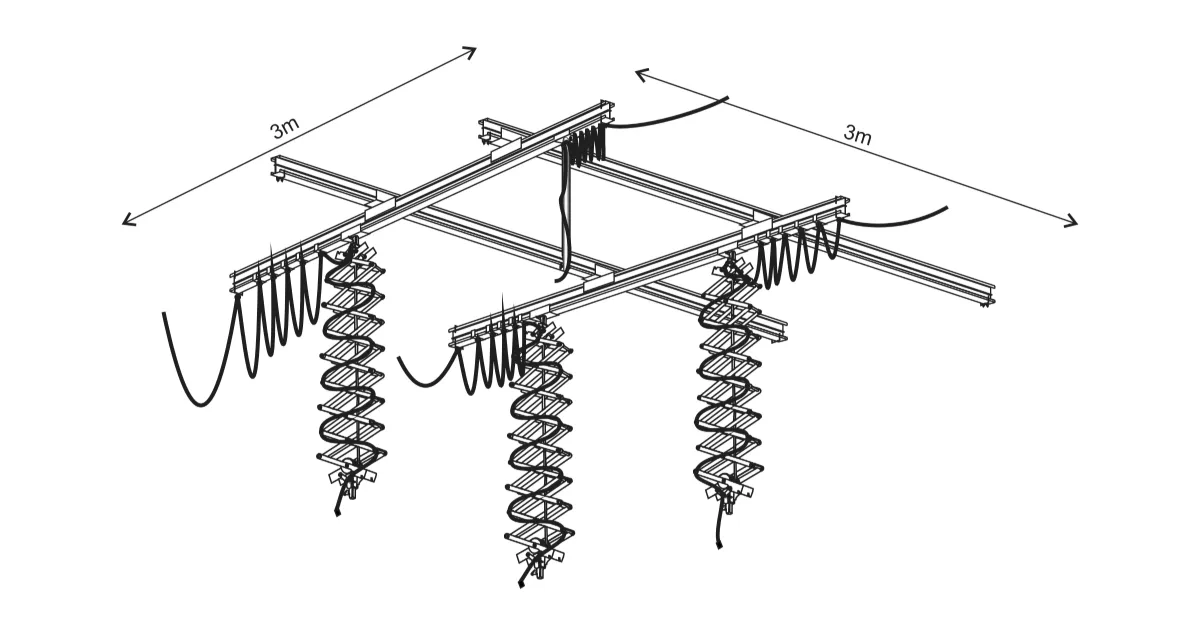
Griestu sistēma: Komplekts 1 (3 x 3m)
FOMEI griestu gaismas armatūras sistēmas komplekts 1 ir 3 x 3 metri un prasa šādas sastāvdaļas un uzstādīšanas procedūras.
- 4 x sliežu ceļš 3m
- 6 x sliežu griestu armatūra
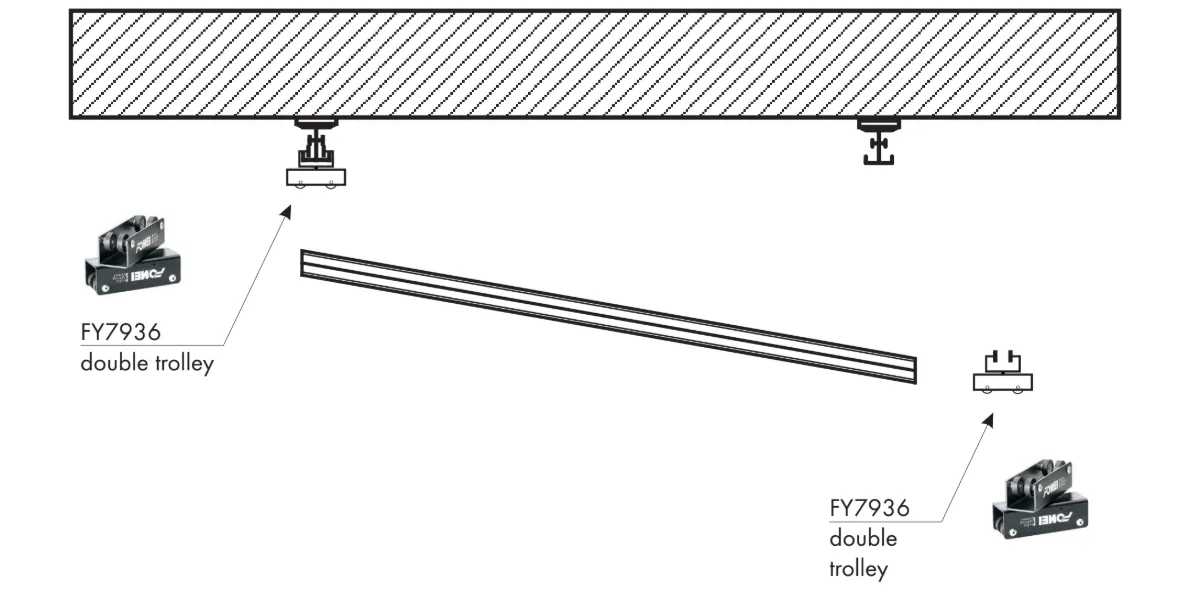
- 4 x dubultais ratiņš
- 3 x pantogrāfs
- 1 x teleskopiskais stienis
- 4 x vienvietīgs ratiņš
- 12 x ratiņi ar kabeļa stiprinājumu
- 55 x pantogrāfa stiprinājums
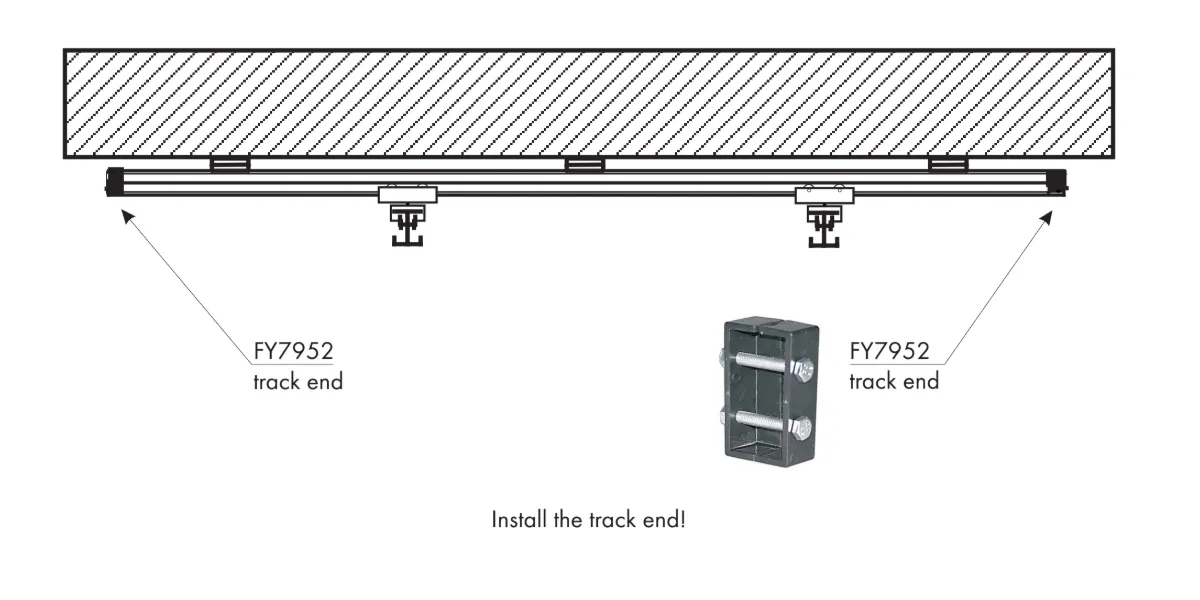
- 8 x sliežu ceļa gals
- 4 x redukcija ar skrūvi
- 4 x drošības kabelis
- 4 x kabelis 10m
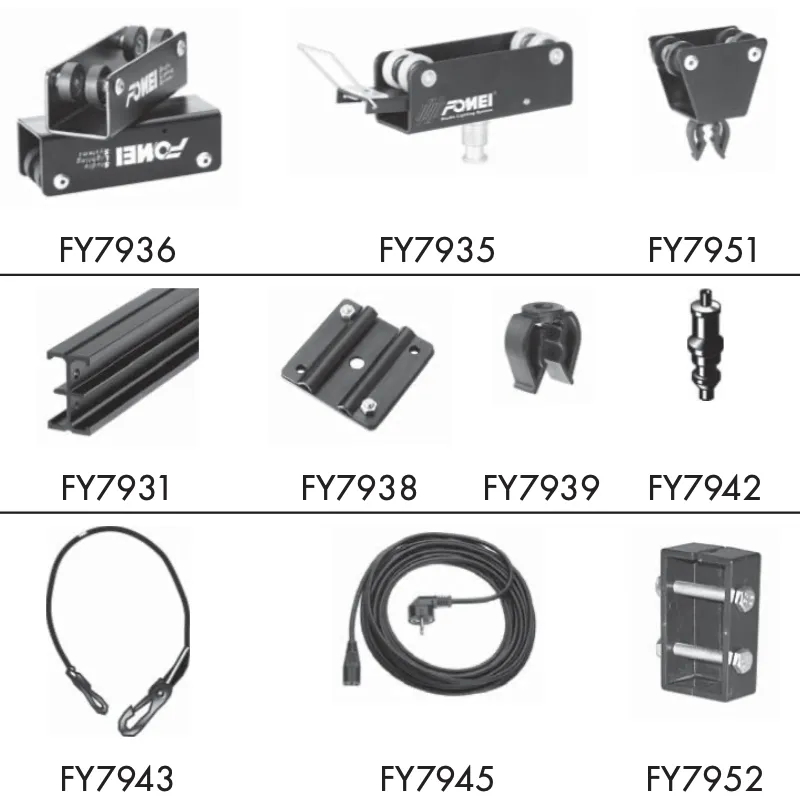
- FY7936 - dubultais ratiņš
- FY7935 – vienvietīgi ratiņi
- FY7951 - kabeļa stiprinājums sliedei
- FY7931 - sliežu ceļš 3m
- FY7938 - sliežu stiprinājums pie griestiem
- FY7939 - kabeļa stiprinājums pie pantogrāfa
- FY7942 - samazinājums
- FY7943 - drošības kabelis
- FY7945 - Maiņstrāvas ievades vads 10m
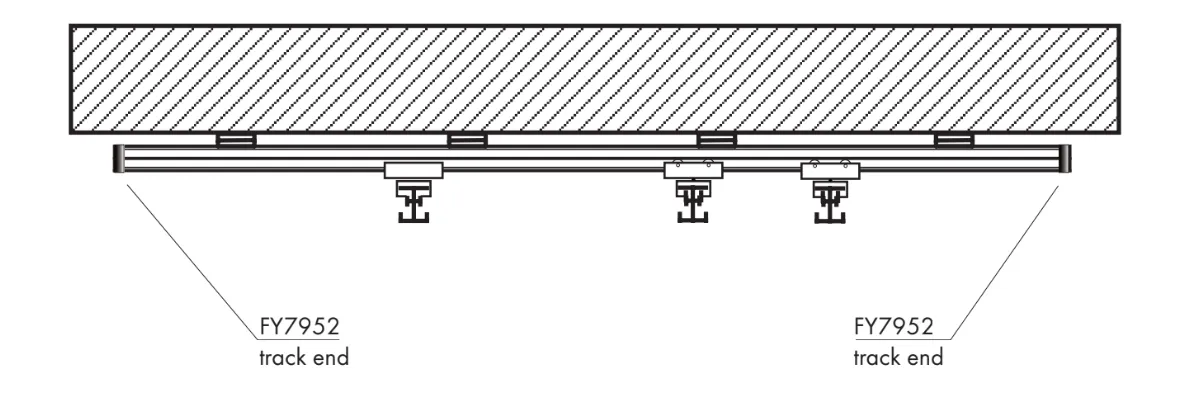
- FY7952 - sliežu ceļa gals
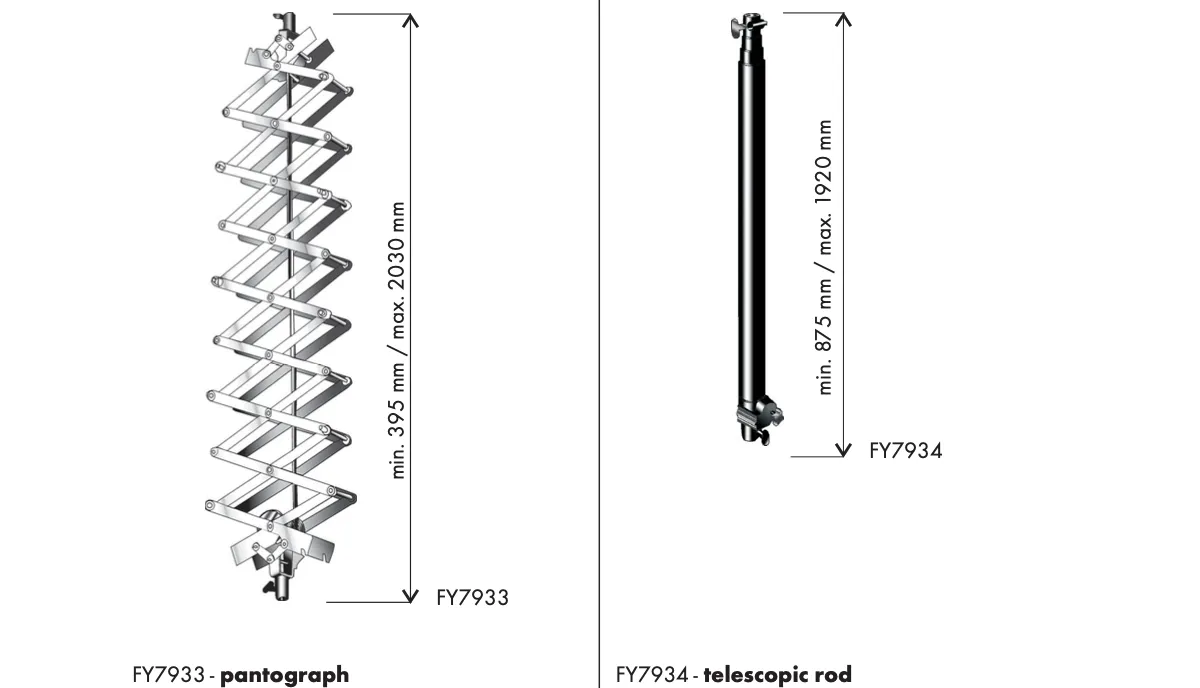
- FY7933 - pantogrāfs
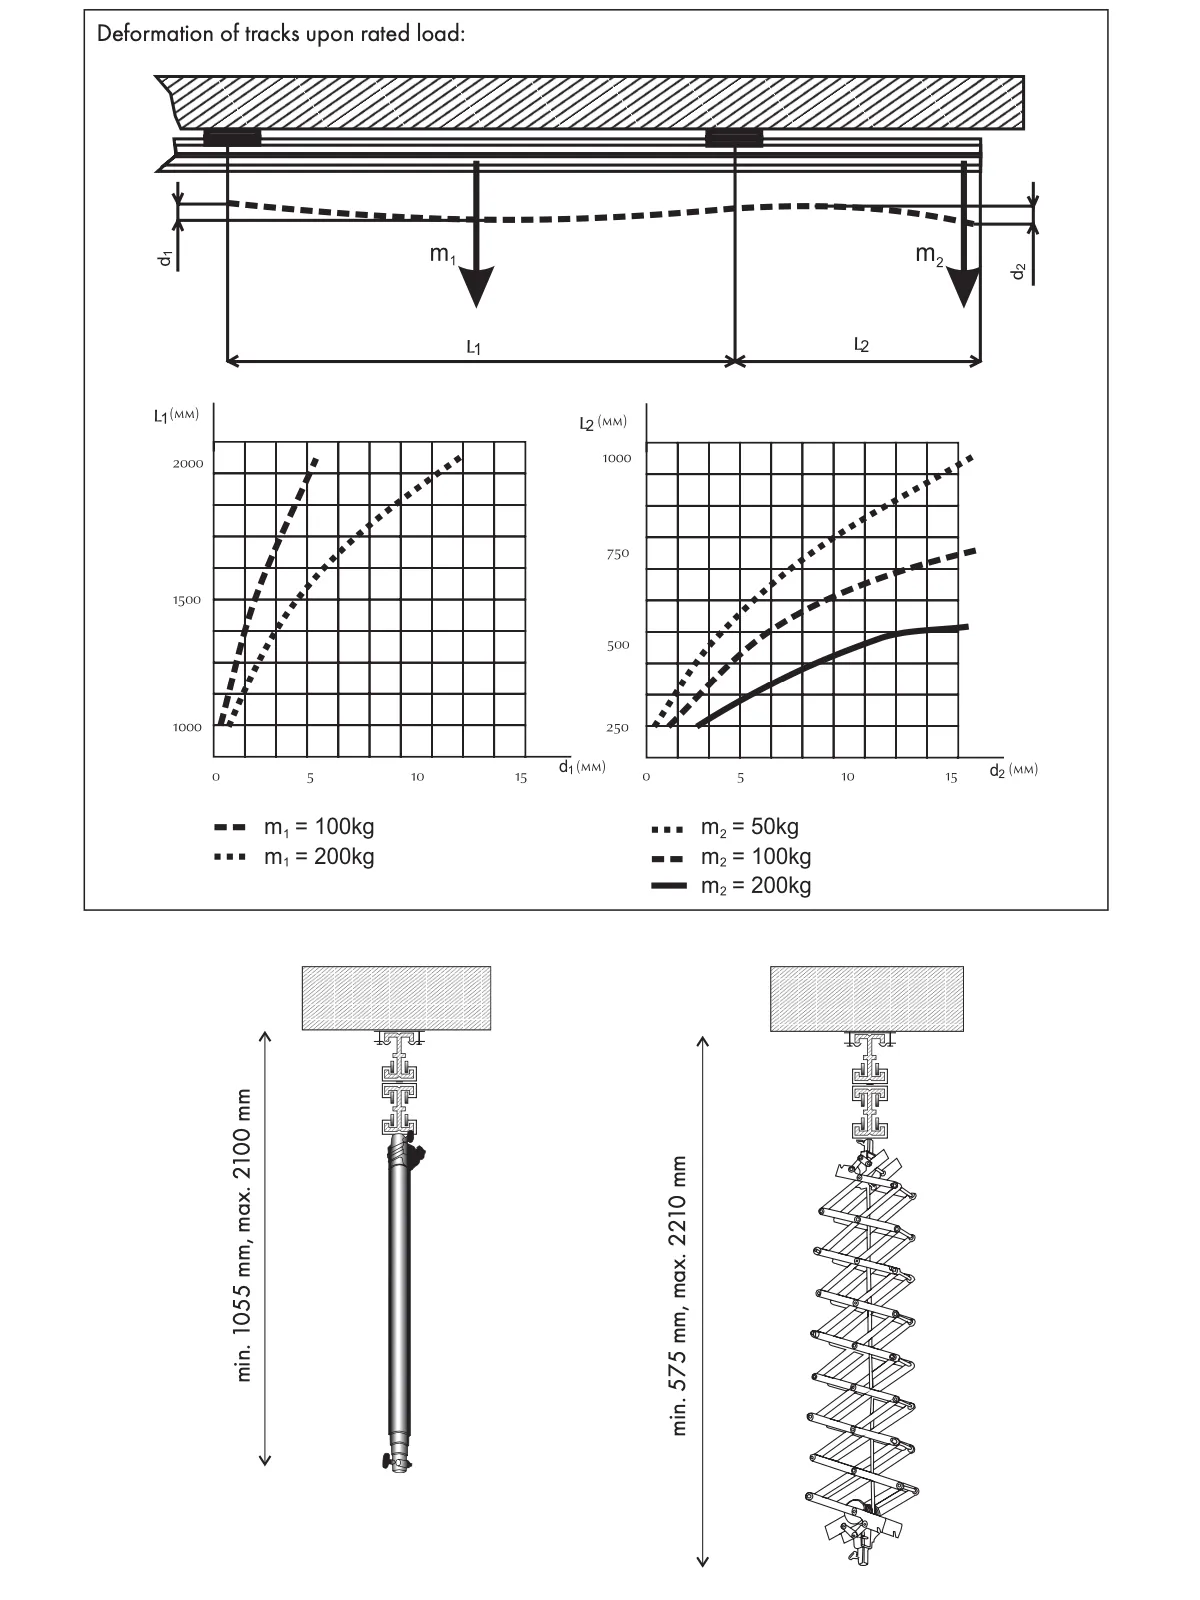
- šķērssija no 395 mm līdz 2030 mm
- maksimālā slodze 1-15 kg
- iespēja regulēt slīdēšanas bloķēšanu
- drošības drošinātājs
- FY7934 - teleskopiskais stienis
- 3 sekcijas
- šķērsstienis no 875 mm līdz 1920 mm
- atsperes vienkāršotai apstrādei
- drošības drošinātājs
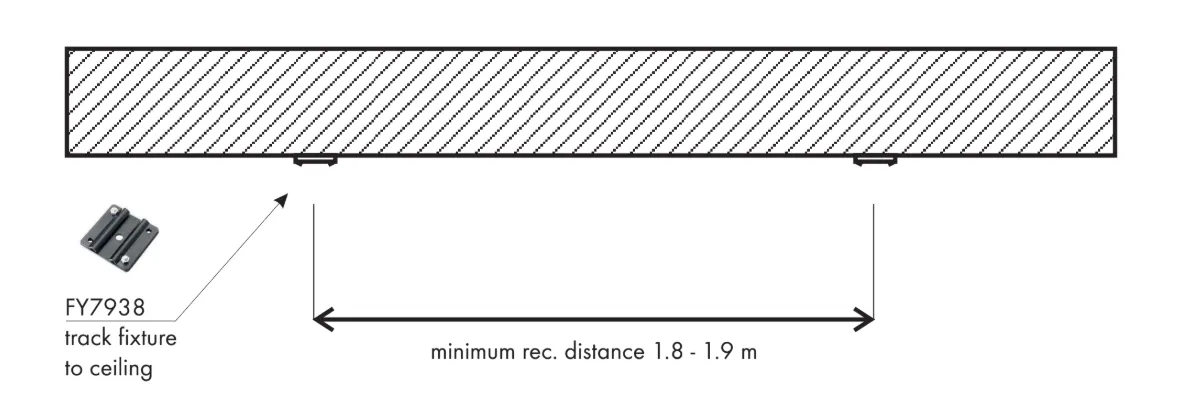
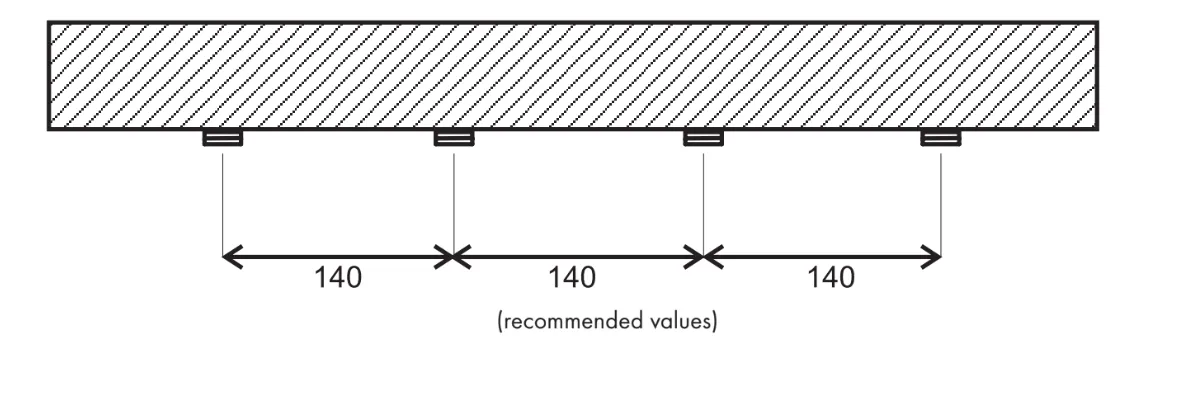
- Galvenajām gultņu sliedēm jābūt vismaz 180 cm attālumā vienai no otras. Tas nodrošina pareizu pārvietojamo riteņu funkcionalitāti.
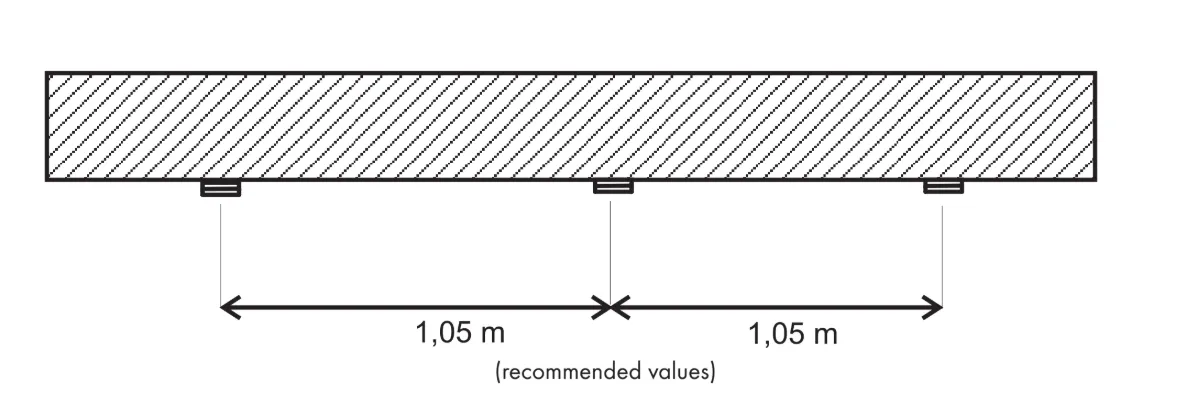
- Ņemiet vērā, ka, ņemot vērā minimālo rites pretestību, ir nepieciešams, lai galvenās sliedes būtu līdzsvarotas.
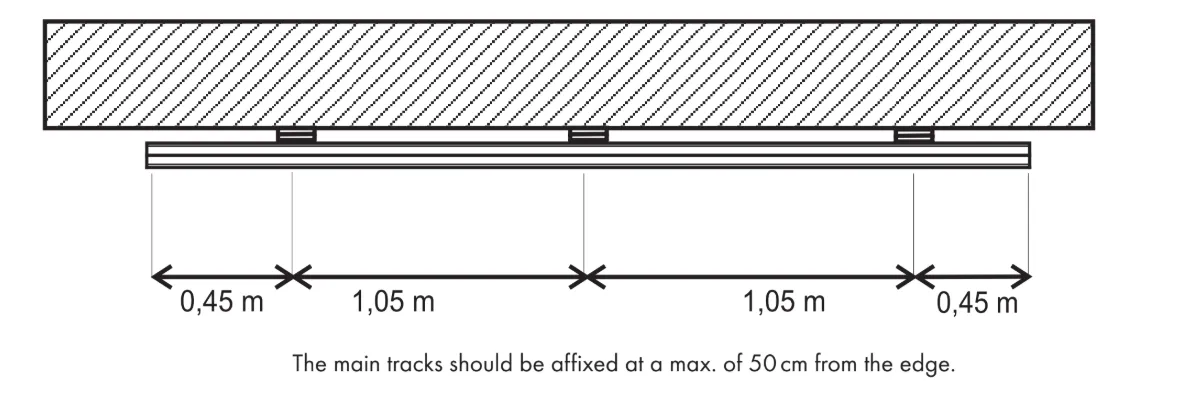
- Pārliecinieties, ka galvenās sliedes ir piestiprinātas ne vairāk kā 50 cm attālumā no malas.
Vispiemērotākā, pārbaudītā sliežu uzstādīšanas procedūra ir šāda.
- Uzstādiet dubultos ratiņus, pagrieztus aptuveni par 80 grādiem, uz vienas no griestiem piestiprinātajām sliedēm.
- Uzstādiet dubulto ratiņus uz pārvietojamās sliedes.
- Iespiediet pārvietojamo sliedi dubultajā ratiņos, kas ir uzstādīti piestiprinātajā sliedē.
- Uzstādiet pārvietojamo sliedi ar ratiņiem piestiprinātajā sliedē.
- Tagad dubultie ratiņi ir uzstādīti uz piestiprinātajām sliedēm, un pārvietojamā sliede ir uzstādīta dubultajos ratiņos.
- Rīkojieties līdzīgi ar pārējām sliedēm.
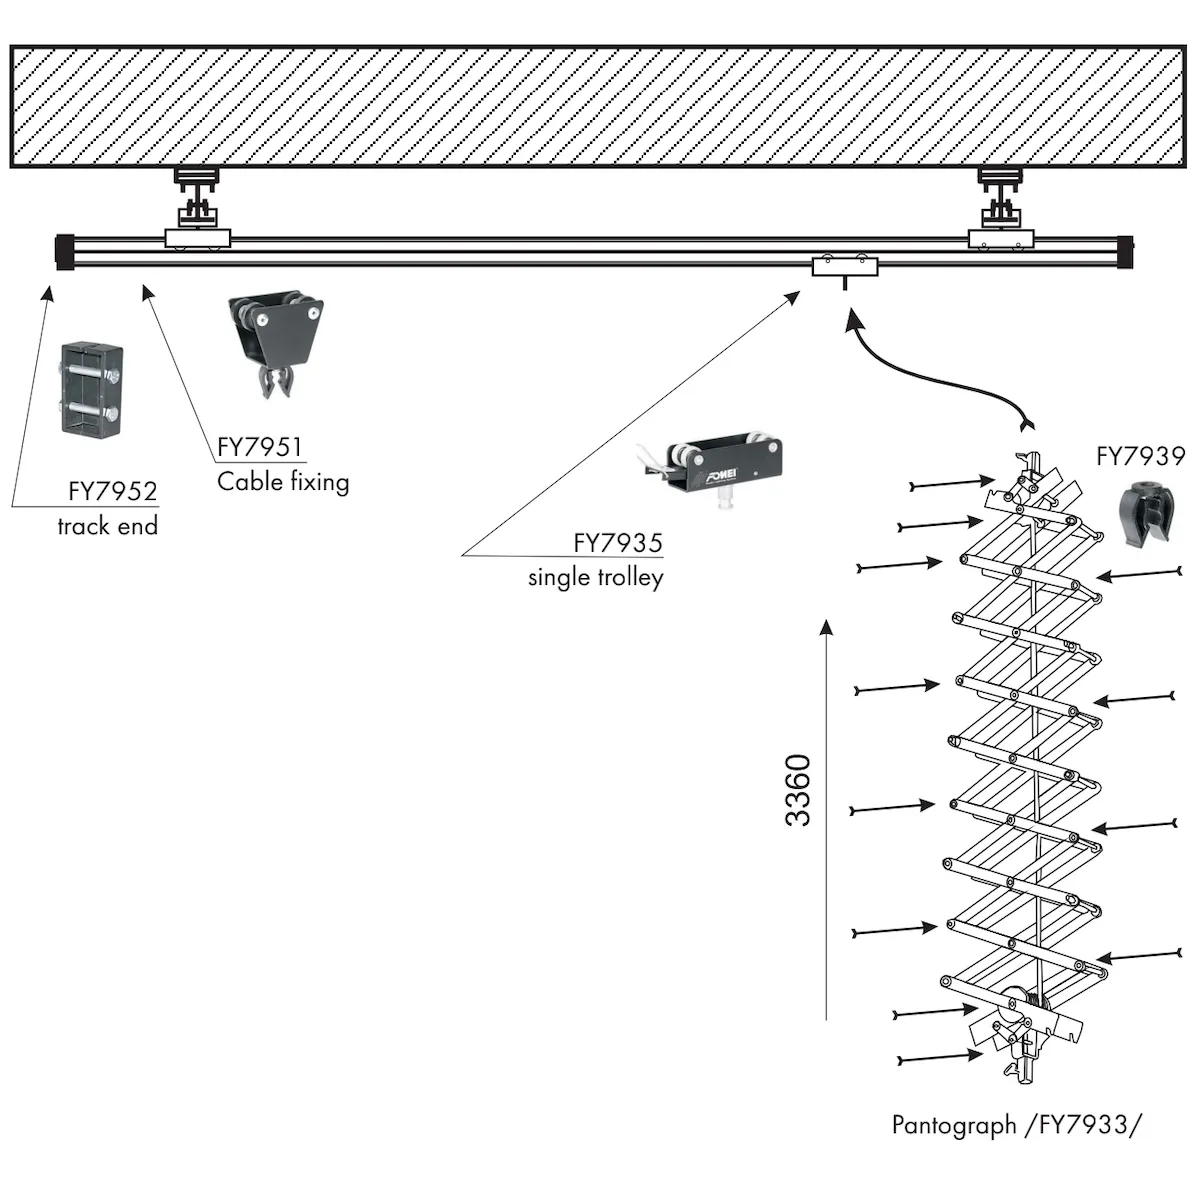
- Uzstādiet vienvietīgos ratiņus /FY7935/ sliedē.
- Uzstādiet ratiņus ar kabeļu stiprinājumiem sliedē /FY7951/.
- Piestipriniet sliežu galus /FY7952/ abās pārvietojamo sliežu pusēs.
- Piestipriniet pantogrāfu /FY7933/ pie vienīgā ratiņa /FY7935/.
- Uzstādiet kabeļa stiprinājumu /FY7939/ uz malām, kas atrodas uz pantogrāfa.
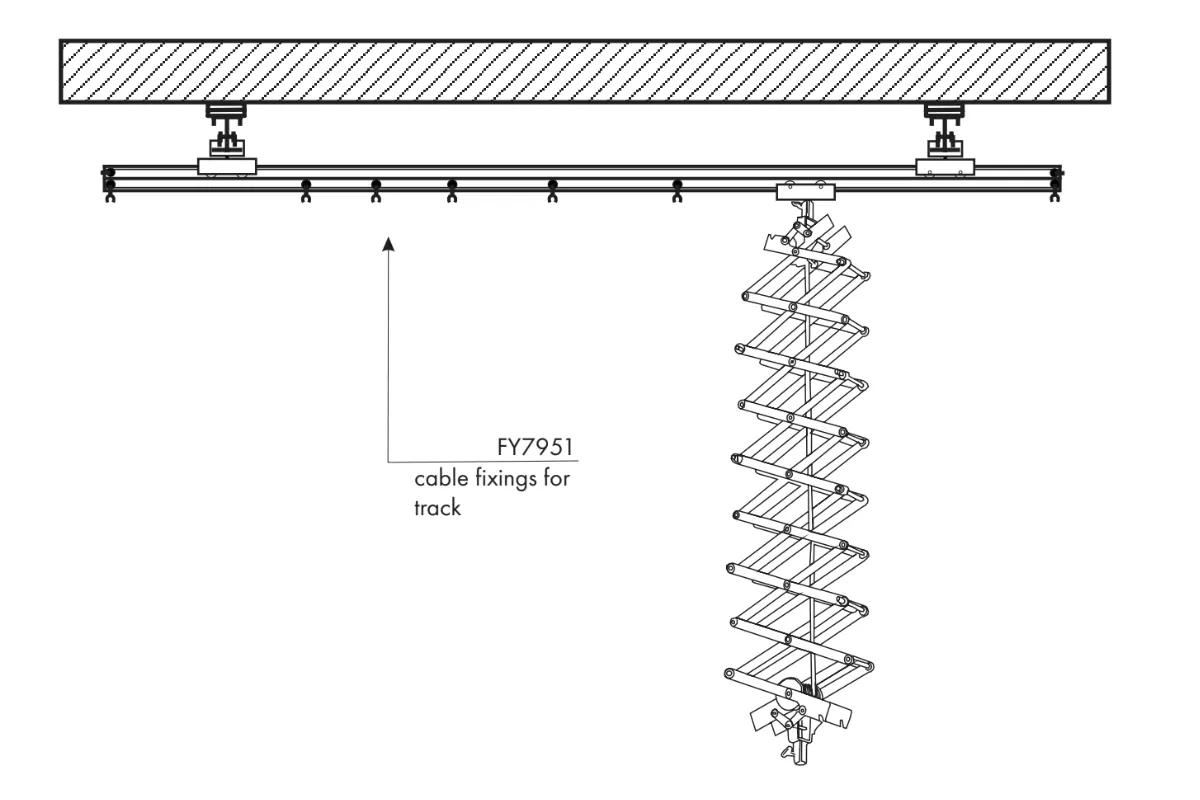
- Vienmērīgi sadaliet kabeļu stiprinājumus pa sliedēm.
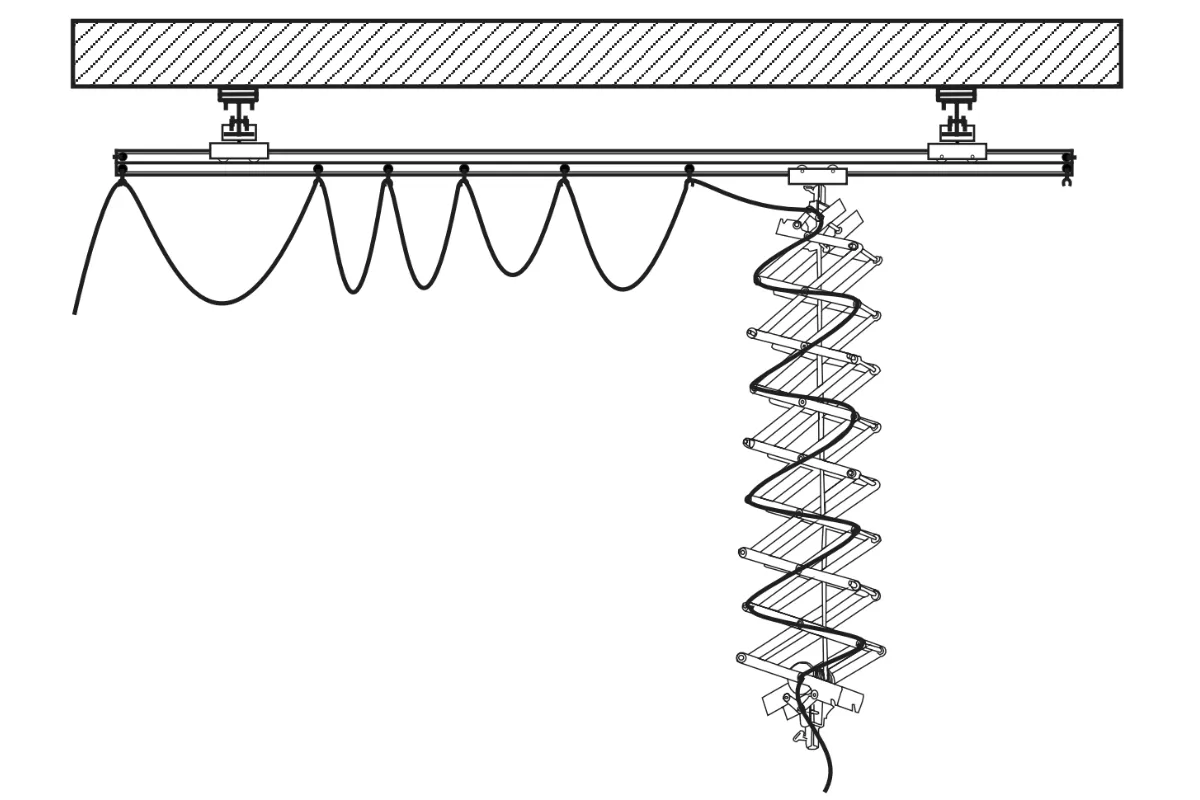
- Uzstādiet kabeli sliedēs un pantogrāfos tā, lai pantogrāfs varētu pārvietoties ar kabeli pa visu sliežu ceļu.
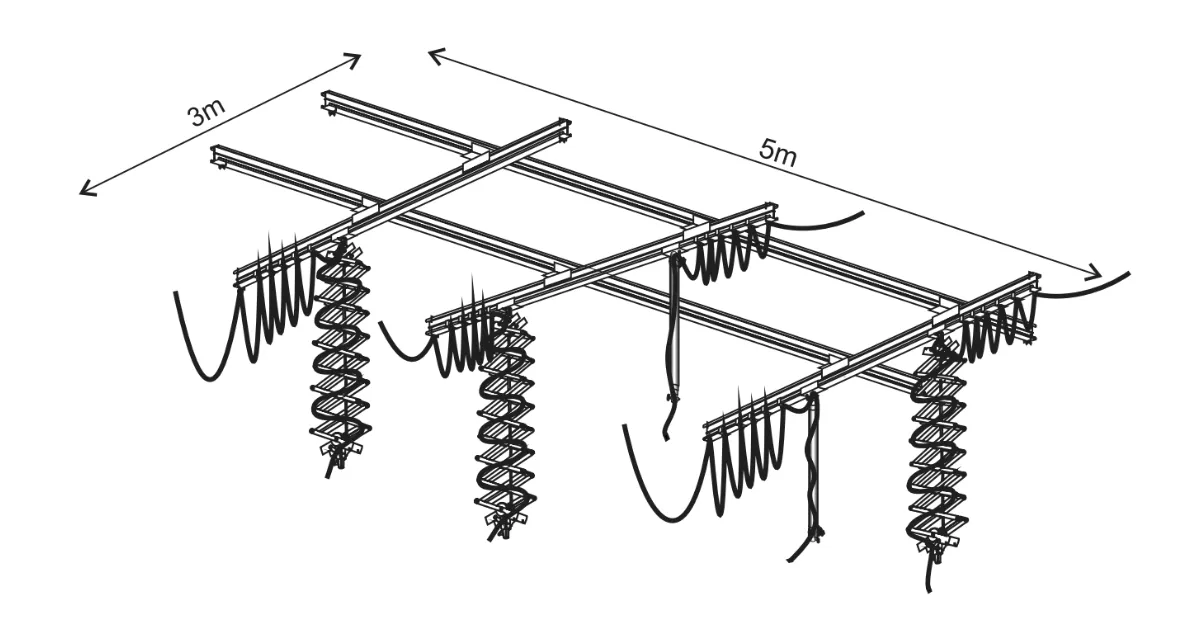
Griestu sistēma: Komplekts 2 (3 x 5m)
FOMEI griestu gaismas ķermeņu sistēmas komplektam 2 (3 x 5 metri) ir nepieciešamas šādas sastāvdaļas un uzstādīšanas procedūras.
- 3x sliežu ceļš 3m
- 2x sliežu ceļš 5m
- 8x sliežu griestu armatūra
- 6x dubultais ratiņš
- 3x pantogrāfs
- 2x teleskopiskais stienis
- 5x vienvietīgs ratiņš
- 70x pantogrāfa stiprinājums
- 10x sliežu ceļa gals - 1 pāris
- 5x samazinājums ar skrūvi
- 5x drošības kabelis
- 5x kabelis 10m
- 15x kabeļu ratiņi
- FY7936 - dubultais ratiņš
- FY7935 – vienvietīgi ratiņi
- FY7951 - kabeļa stiprinājums sliedei
- FY7931 - sliežu ceļš 3m
- FY7938 - sliežu stiprinājums pie griestiem
- FY7939 - kabeļa stiprinājums pie pantogrāfa
- FY7942 - samazinājums
- FY7943 - drošības kabelis
- FY7945 - Maiņstrāvas ievades vads 10m
- FY7952 - sliežu ceļa gals
- FY7933 - pantogrāfs
- šķērssija no 395 mm līdz 2030 mm
- maksimālā slodze 1-15 kg
- iespēja regulēt slīdēšanas bloķēšanu
- drošības drošinātājs
- FY7934 - teleskopiskais stienis
- 3 sekcijas
- šķērsstienis no 875 mm līdz 1920 mm
- atsperes vienkāršotai apstrādei
- drošības drošinātājs
- Galvenajām gultņu sliedēm jābūt vismaz 180 cm attālumā vienai no otras. Tas nodrošina pareizu pārvietojamo riteņu funkcionalitāti.
- Ņemiet vērā, ka, ņemot vērā minimālo rites pretestību, ir nepieciešams, lai galvenās sliedes būtu līdzsvarotas.

- Pārliecinieties, ka galvenās sliedes ir piestiprinātas ne vairāk kā 50 cm attālumā no malas.
Vispiemērotākā, pārbaudītā sliežu uzstādīšanas procedūra ir šāda.
- Uzstādiet dubultos ratiņus, pagrieztus aptuveni par 80 grādiem, uz vienas no griestiem piestiprinātajām sliedēm.
- Uzstādiet dubulto ratiņus uz pārvietojamās sliedes.
- Iespiediet pārvietojamo sliedi dubultajā ratiņos, kas ir uzstādīti piestiprinātajā sliedē.
- Uzstādiet pārvietojamo sliedi ar ratiņiem piestiprinātajā sliedē.
- Tagad dubultie ratiņi ir uzstādīti uz piestiprinātajām sliedēm, un pārvietojamā sliede ir uzstādīta dubultajos ratiņos.
- Rīkojieties līdzīgi ar pārējām sliedēm.
- Uzstādiet vienvietīgos ratiņus /FY7935/ sliedē.
- Uzstādiet ratiņus ar kabeļu stiprinājumiem sliedē /FY7951/.
- Piestipriniet sliežu galus /FY7952/ abās pārvietojamo sliežu pusēs.
- Piestipriniet pantogrāfu /FY7933/ pie vienīgā ratiņa /FY7935/.
- Uzstādiet kabeļa stiprinājumu /FY7939/ uz malām, kas atrodas uz pantogrāfa.
- Vienmērīgi sadaliet kabeļu stiprinājumus pa sliedēm.
- Uzstādiet kabeli sliedēs un pantogrāfos tā, lai pantogrāfs varētu pārvietoties ar kabeli pa visu sliežu ceļu.
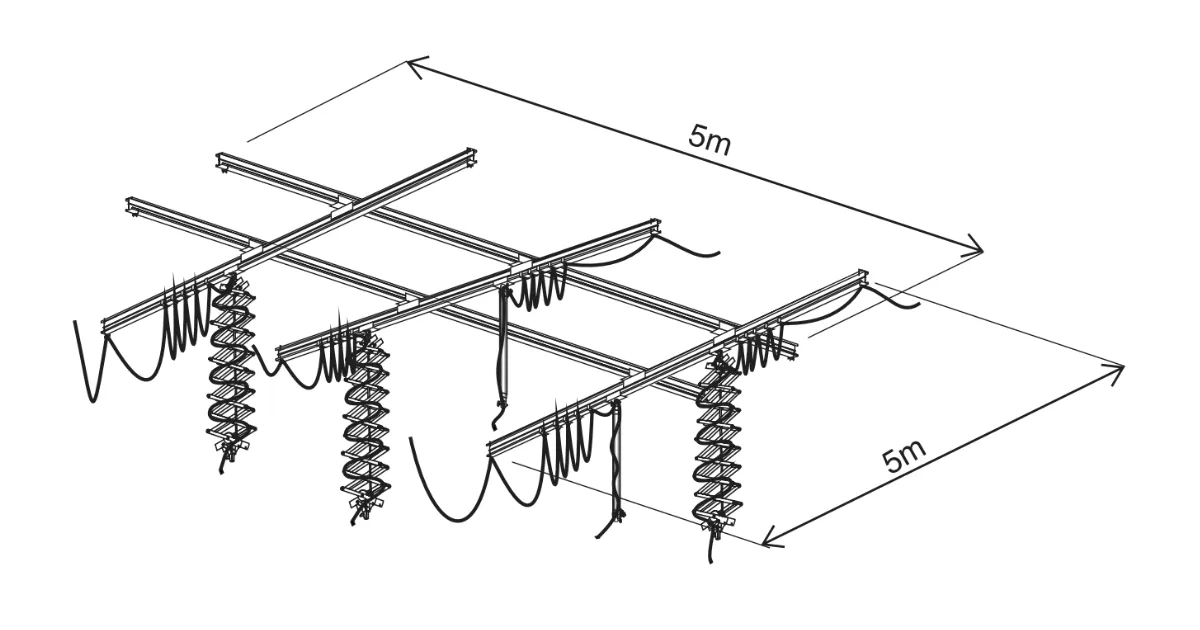
Griestu sistēma: Komplekts 3 (5 x 5m)
FOMEI griestu gaismas ķermeņu sistēmas komplektam 3 (5 x 5 metri) ir nepieciešamas šādas sastāvdaļas un uzstādīšanas procedūras.
- 5x sliežu ceļš 5m
- 8x sliežu griestu armatūra
- 6x dubultais ratiņš
- 3x pantogrāfs
- 2x teleskopiskais stienis
- 5x vienvietīgs ratiņš
- 70x pantogrāfa stiprinājums
- 10x sliežu ceļa gals - 1 pāris
- 5x samazinājums ar skrūvi
- 5x drošības kabelis
- 5x kabelis 10m
- 15x kabeļu ratiņi
- FY7936 - dubultais ratiņš
- FY7935 – vienvietīgi ratiņi
- FY7951 - kabeļa stiprinājums sliedei
- FY7931 - sliežu ceļš 3m
- FY7938 - sliežu stiprinājums pie griestiem
- FY7939 - kabeļa stiprinājums pie pantogrāfa
- FY7942 - samazinājums
- FY7943 - drošības kabelis
- FY7945 - Maiņstrāvas ievades vads 10m
- FY7952 - sliežu ceļa gals
- FY7933 - pantogrāfs
- šķērssija no 395 mm līdz 2030 mm
- maksimālā slodze 1-15 kg
- iespēja regulēt slīdēšanas bloķēšanu
- drošības drošinātājs
- FY7934 - teleskopiskais stienis
- 3 sekcijas
- šķērsstienis no 875 mm līdz 1920 mm
- atsperes vienkāršotai apstrādei
- drošības drošinātājs
- Galvenajām gultņu sliedēm jābūt vismaz 180 cm attālumā vienai no otras. Tas nodrošina pareizu pārvietojamo riteņu funkcionalitāti.
- Ņemiet vērā, ka, ņemot vērā minimālo rites pretestību, ir nepieciešams, lai galvenās sliedes būtu līdzsvarotas.
- Pārliecinieties, ka galvenās sliedes ir piestiprinātas ne vairāk kā 50 cm attālumā no malas.
Vispiemērotākā, pārbaudītā sliežu uzstādīšanas procedūra ir šāda.
- Uzstādiet dubultos ratiņus, pagrieztus aptuveni par 80 grādiem, uz vienas no griestiem piestiprinātajām sliedēm.
- Uzstādiet dubulto ratiņus uz pārvietojamās sliedes.
- Iespiediet pārvietojamo sliedi dubultajā ratiņos, kas ir uzstādīti piestiprinātajā sliedē.
- Uzstādiet pārvietojamo sliedi ar ratiņiem piestiprinātajā sliedē.
- Tagad dubultie ratiņi ir uzstādīti uz piestiprinātajām sliedēm, un pārvietojamā sliede ir uzstādīta dubultajos ratiņos.
- Rīkojieties līdzīgi ar pārējām sliedēm.
- Uzstādiet vienvietīgos ratiņus /FY7935/ sliedē.
- Uzstādiet ratiņus ar kabeļu stiprinājumiem sliedē /FY7951/.
- Piestipriniet sliežu galus /FY7952/ abās pārvietojamo sliežu pusēs.
- Piestipriniet pantogrāfu /FY7933/ pie vienīgā ratiņa /FY7935/.
- Uzstādiet kabeļa stiprinājumu /FY7939/ uz malām, kas atrodas uz pantogrāfa.
- Vienmērīgi sadaliet kabeļu stiprinājumus pa sliedēm.
- Uzstādiet kabeli sliedēs un pantogrāfos tā, lai pantogrāfs varētu pārvietoties ar kabeli pa visu sliežu ceļu.
Noslēguma piezīmes
Lai iegūtu oficiālo dokumentāciju no ražotāja un garantijas informāciju par jūsu konkrēto FOMEI ierīci, apmeklējiet oficiālo FOMEI vietni fomei.com.


EOS Rebel sērija


EOS DSLR sērija


EOS M Mirrorless sērija


PowerShot sērija


Tuvplāns / Rokas

Canon EOS Rebel sērija piedāvā iesācējiem draudzīgas DSLR kameras ar stabilu attēla kvalitāti, intuitīvu vadību un daudzpusīgām funkcijām. Šīs kameras, kas ir ideāli piemērotas fotografēšanas entuziastiem, nodrošina uzticamu autofokusu, mainīga leņķa skārienekrānus un Full HD vai 4K video ierakstīšanu.
Sakars
Izšķirtspēja (MP)
Izšķirtspēju
Canon EOS DSLR sērija nodrošina augstas kvalitātes attēlus, ātru autofokusu un daudzpusību, padarot to ideāli piemērotu gan fotografēšanai, gan video veidošanai.
Sakars
Izšķirtspēja (MP)
Izšķirtspēju
Canon EOS M Mirrorless sērija apvieno kompaktu dizainu ar DSLR līdzīgu veiktspēju. Šīs kameras ar maināmiem objektīviem, ātru autofokusu un augstas kvalitātes attēla sensoriem ir lieliski piemērotas ceļotājiem un satura veidotājiem, kuri meklē pārnesamību, nezaudējot attēla kvalitāti.
Sakars
Izšķirtspēja (MP)
Izšķirtspēju
Canon PowerShot sērija piedāvā kompaktas, lietotājam draudzīgas kameras ikdienas šāvējiem un entuziastiem. Ar modeļiem, sākot no vienkāršām norādīšanas un fotografēšanas līdz uzlabotām tālummaiņas kamerām, tie nodrošina ērtības, stabilu attēla kvalitāti un tādas funkcijas kā attēla stabilizācija un 4K video.
Sakars
Izšķirtspēja (MP)
Izšķirtspēju
Canon tuvplāna un rokas kameras ir paredzētas detalizētai, tuvplāna fotografēšanai un video uzņemšanai. Kompakti un viegli lietojami, tie piedāvā precīzu fokusu, augstas izšķirtspējas attēlveidošanu un daudzpusīgas makro iespējas - lieliski piemēroti vlogošanai, produktu fotografēšanai un radošiem tuvplāniem.


